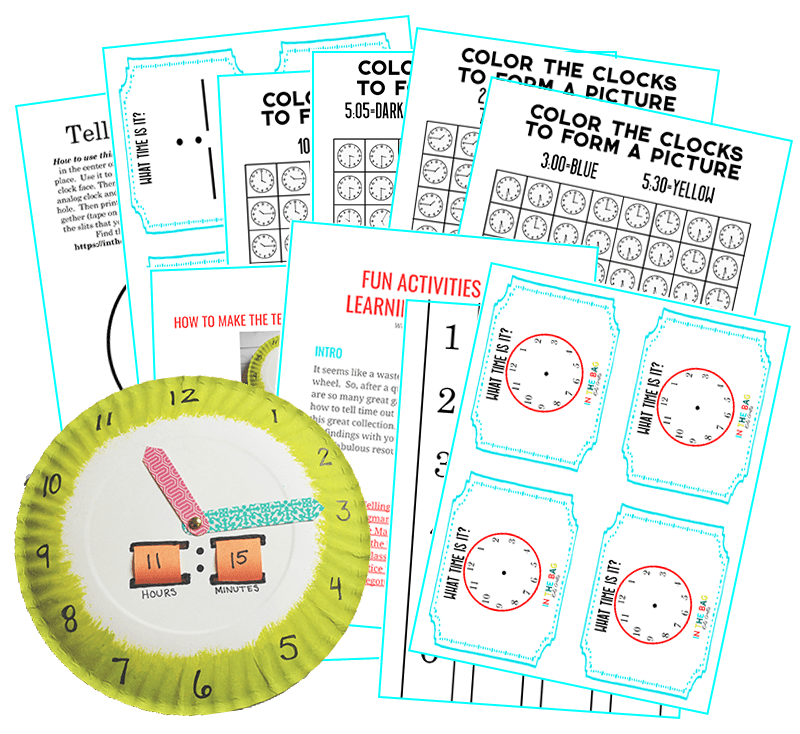
Learn to Tell Time Craft
There are two main types of clocks…
digital and analog. A digital clock is like that on our phones, super simple to read because the numbers are right there for you. The other type is an analog clock, which has numbers 1-12 on a round face with minute and hour hands. And this type can be a little trickier to learn to read properly. In most schools, you will find analog clocks. So, this is an important skill for kids to learn. This easy to make interactive analog clock will help your kiddo learn to tell time by putting them side by side for comparison. So much better than more telling time worksheets.
Make Telling Time Easier with the Bonus Bundle
*This learn to tell time craft is unlike other crafts on this site as it REQUIRES adult assistance for a couple of steps. So, don’t go too far away. Your hands will be needed.
Save this Learn to Tell Time Craft for later. Pin it to your favorite Pinterest board…

This post contains affiliate links, which means if you make a purchase through these links, I may receive a small commission at no extra cost to you. Click here to read my full disclosure policy.
SUPPLIES FROM THE BAG
- 2 Paper plates (coated 9-inch)
- Paint
- Newspaper
- Clothespin
- Large pompom
- Black sharpie marker
- Scissors
- Tape
- Brad
- Hole punch
- Pencil
- Construction paper (color of your choice)
- Washi tape (optional)
- Printable Templates for making the clock face and number strips
You will notice that we do things a little differently around here. First of all, every craft is made FOR kids, not to be made by adults for kids to just look at. Second, we use the same MASTER LIST to make every craft on this site. Using this approach makes it so much easier for you to find the time you have been looking for so that you can slow down and create with your family!
Step 1: Make the clock
- To make your digital clock on the face of your analog clock, cut 2 sets of slits in the bottom half of one of the plates (as pictured). The slits should be approximately 1 inch wide. THIS IS A JOB FOR AN ADULT. SERIOUSLY.
- Make a hole in the center of the plate for the hands of the analog clock. You can use scissors or a pen/pencil for this. THIS IS ALSO A JOB FOR AN ADULT. PLEASE BE CAREFUL.
- Sign up below to get the printable template to make this craft so much easier! You can also print out the number strips.

Step 2: Make the hands
- Cut 2 small strips from the other paper plate, about 1/2″ wide, and cut a point at the end.
- Trim the length of each strip to make the hour and minute hands.
- Optional: Cover each hand in washi tape. You can also paint or color the hands.
- Punch a hole in the end.

Step 3: Paint
- Place the plate on a piece of newspaper
- Pinch the pompom with the clothespin to form a “paint brush”
- Squeeze a color of choice on the newspaper
- Paint your clock with whatever design you would like

Step 4: Add the numbers
- While you wait for the paint to dry, cut 2 long strips of paper from your construction paper.
- Use a straight edge and make the strips about 1 inch wide. After they are cut, test them through the slots to make sure that they fit.
- On one strip of paper, write numbers 1-12. It works best to start in the middle and work your way out, leaving a small space in between each as you go. If you are not sure about spacing, slide the strip into the slots to make sure they are spaced out enough. And if you run out of space on a strip, just tape another piece of paper to it to lengthen it.
- *You can choose to use the printable number strips instead of making them from scratch. Just treat them the same way by taping them together into a loop.

Step 5: Put it together
- First use the metal brad to attach the clock hands. Be sure not to pinch the brad open too tight. You want the clock hands to be secure but be able to move easily.
- Now that your paint has dried, use the black sharpie marker to write the numbers on the face of the clock around the outside.
- Last, feed the number strips through the slots that you have made and tape it into a loop on the back
- Now you are ready to practice learning to tell time! For extra practice, get the printable flashcards and worksheets that go along with this craft.


This craft would make a great addition to telling time kindergarten lesson plans. Make it in class and then send it home for extra practice, even better than telling time worksheets. I mean, anything is better than just another worksheet. There are so many fun ways to teach time. I cannot wait to hear what you do with this learn to tell time clock.
Happy Crafting!
XOXO -Joy
Save this for later! Pin it to your favorite Pinterest board…