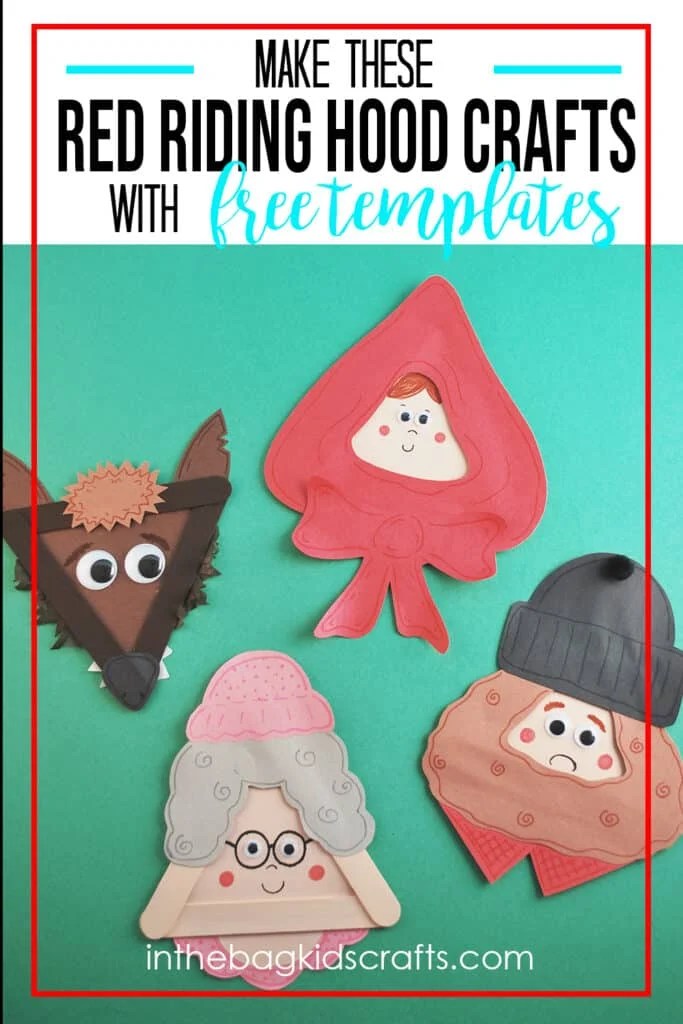
Little Red Riding Hood Crafts
These Little Red Riding Hood crafts go together rather quickly when you use the free printable templates. Kids as young as preschoolers can make these if you help with the cutting. They will love putting them together and decorating them…and then, of course, playing with them. They make even better Little Red Riding Hood activities for kindergarten, as this age group should be able to make up their own stories. And the best crafts lead to imaginative play.
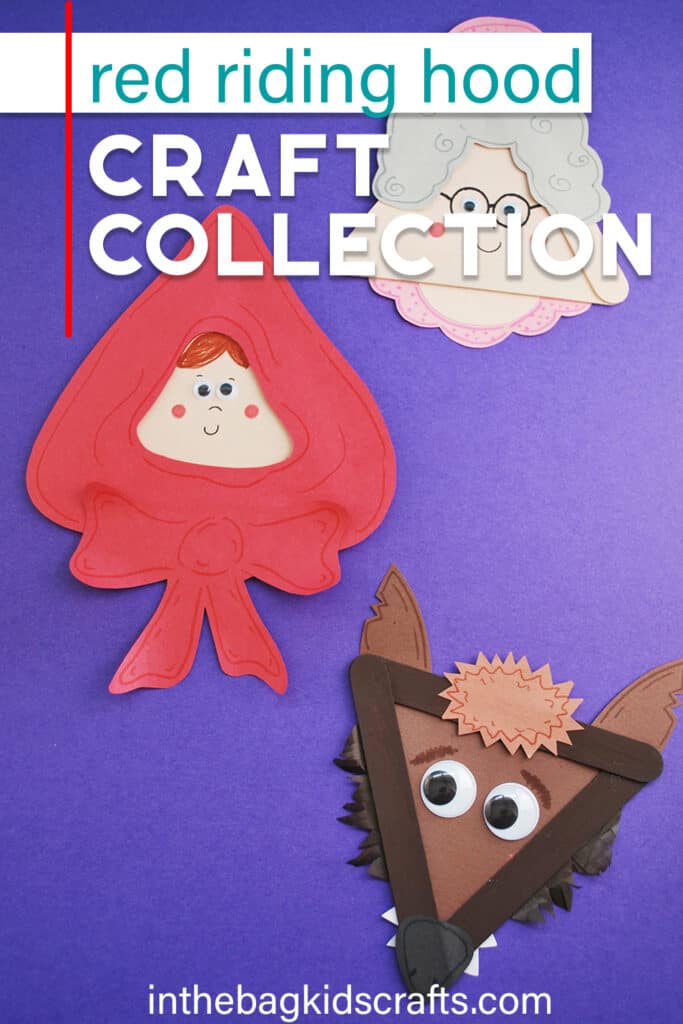
Save these Little Red Riding Hood Craft Ideas for later. Pin to your favorite Pinterest board…
All activities require adult supervision. By using this site, you are agreeing to our terms of use. This post contains affiliate links, which means if you make a purchase through these links, I may receive a small commission at no extra cost to you. Click here to read my full disclosure policy.
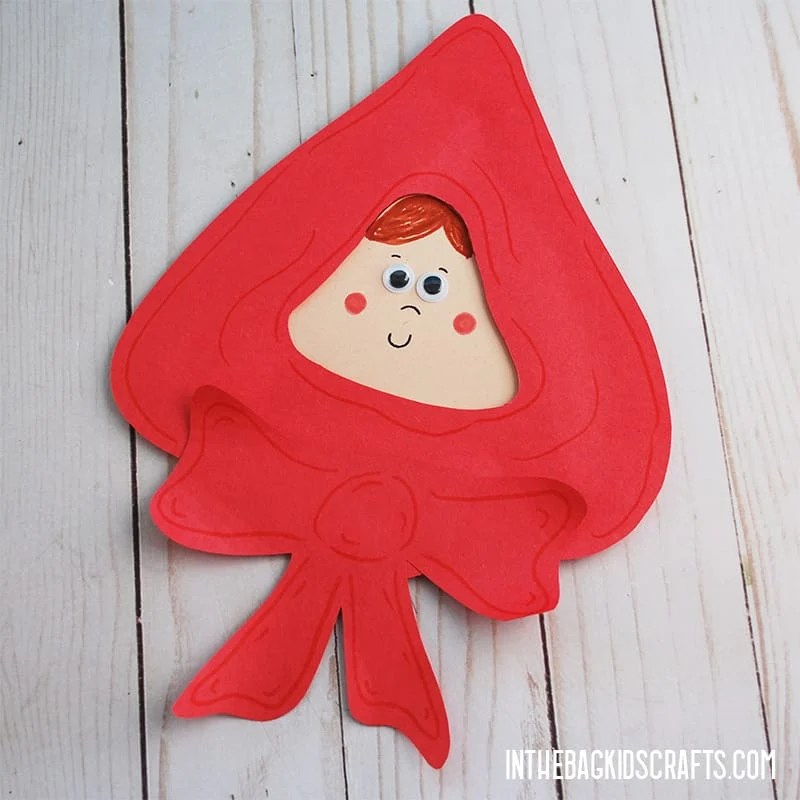
Craft #1: Little Red Riding Hood Craft
SUPPLIES FROM THE BAG
- 3 Large popsicle sticks
- Elmer’s glue
- Construction paper (flesh tone shade of your choice and red)
- Scissors
- Pencil
- Glue stick
- 2 Small googly eyes (self-adhesive are best)
- Markers
- Little Red Riding Hood Printables
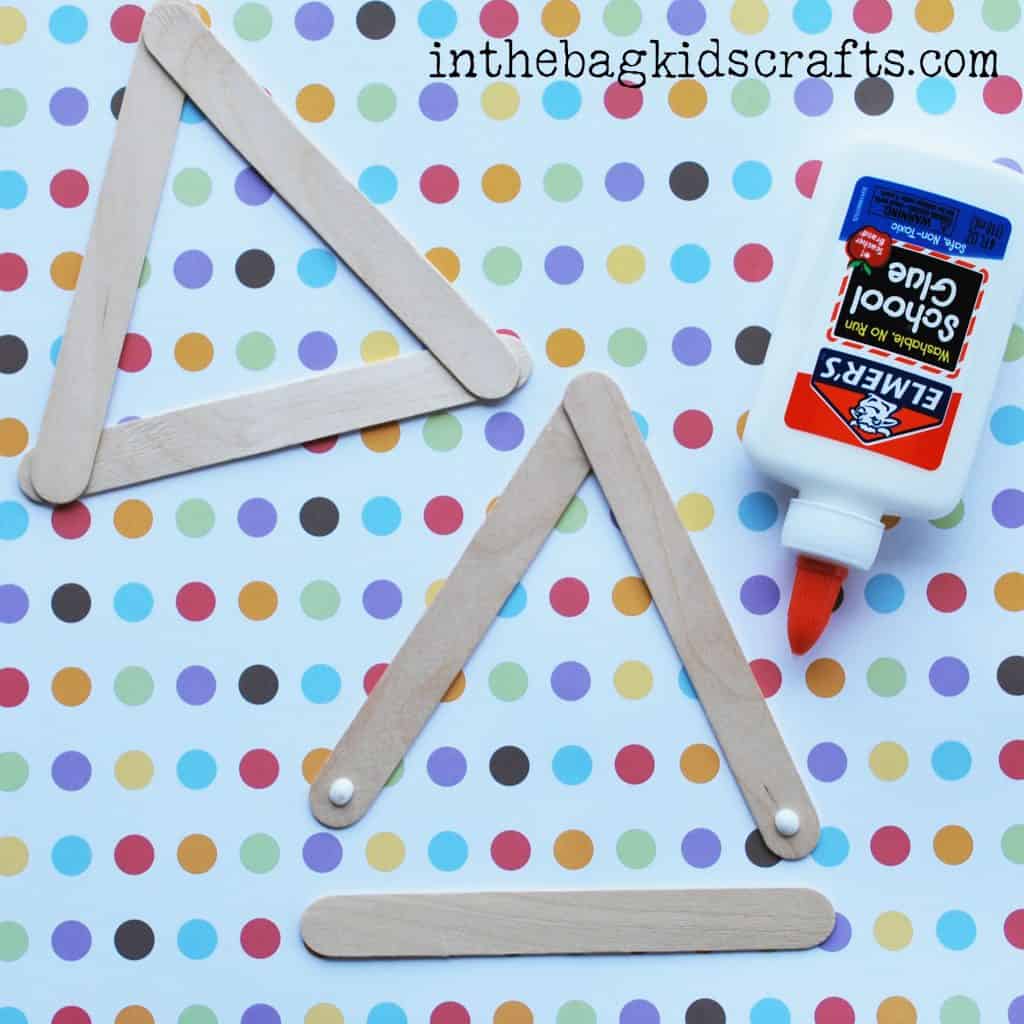
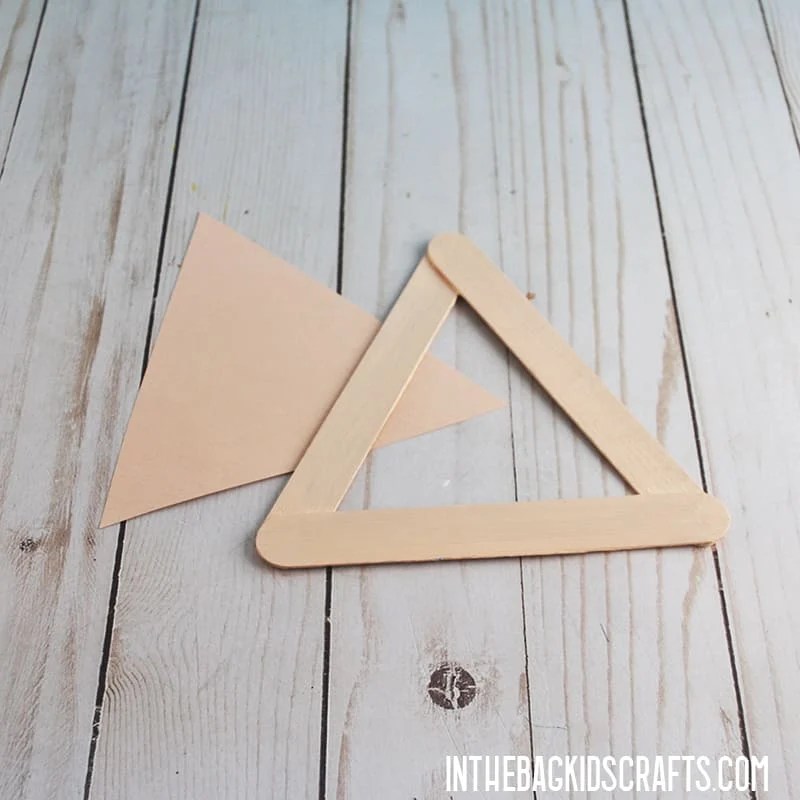
Step 1: Make the Triangle
- Use the Elmer’s glue to attach 3 large popsicle sticks, forming a triangle frame
- Set the triangle to the side and allow the glue to dry thoroughly
*This is a step that you may want to do the day before and let them sit overnight so that the glue dries completely. While you are at it, make lots of triangle frames so that you are ready to make as many Little Red Riding Hood crafts as you want! (And, believe me, you are going to want to make them all and then some!)
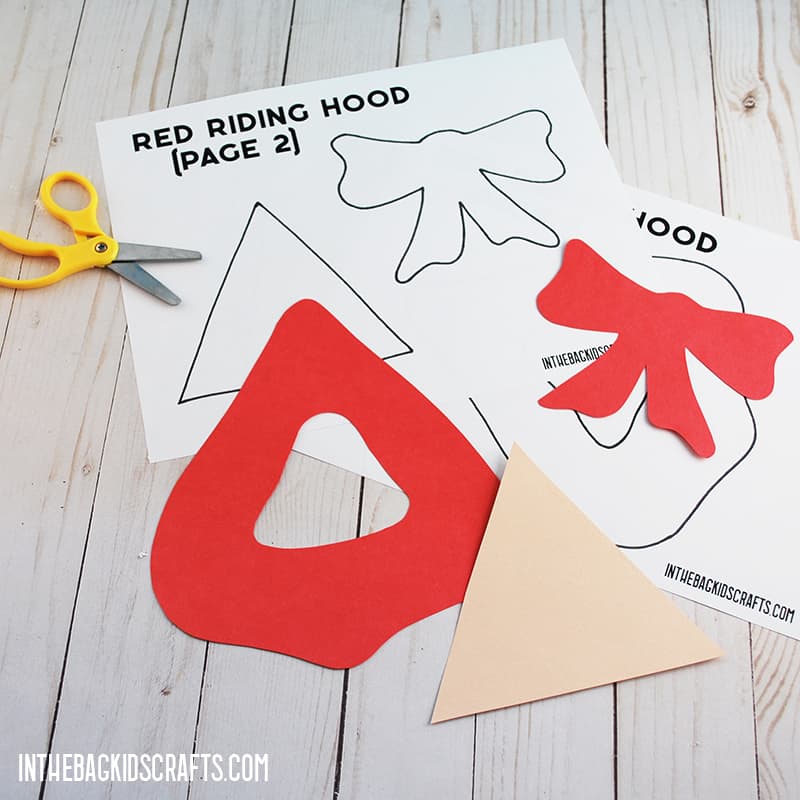
Step 2: Use the Red Riding Hood Template
- Print the free Little Red Riding Hood printables.
- Trace each part onto the colored construction paper. Use the photo as a guide for what colors to use. (Basically everything for Cinderella is light blue except for her yellow hair, flesh tone body and white shoes)
*If you do not have access to a printer, you can look at the craft or the template and draw the pieces free-hand to cut out.
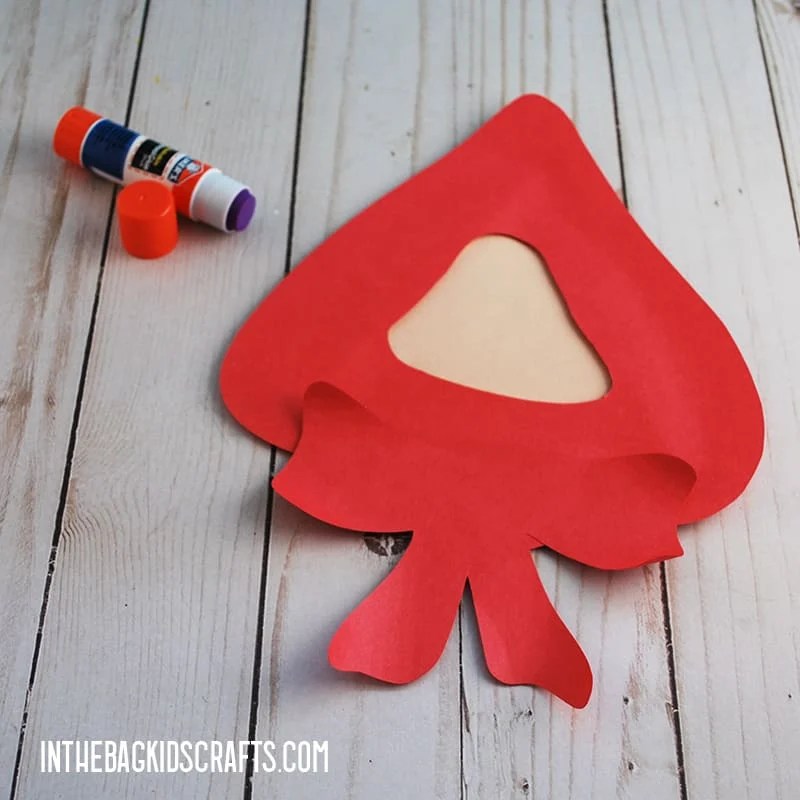
Step 3: Put It Together
- First, use the glue stick to adhere the flesh colored triangle onto the back of the popsicle stick triangle frame.
- Then, adhere the other parts of Red Riding Hood with your glue stick, using the picture as a reference.
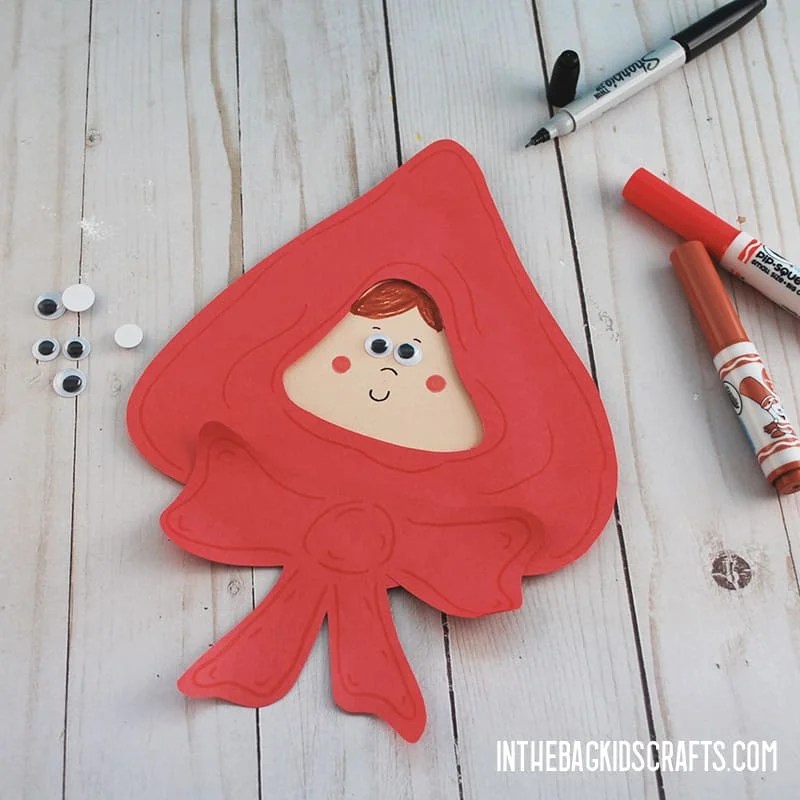
Step 4: Add the Details
- Put Little Red Riding Hood’s eyes in place.
- Next, draw on her face.
- Add other details as you would like. For example, we gave Little Red Riding Hood some bangs and red highlights around the hood and bow.
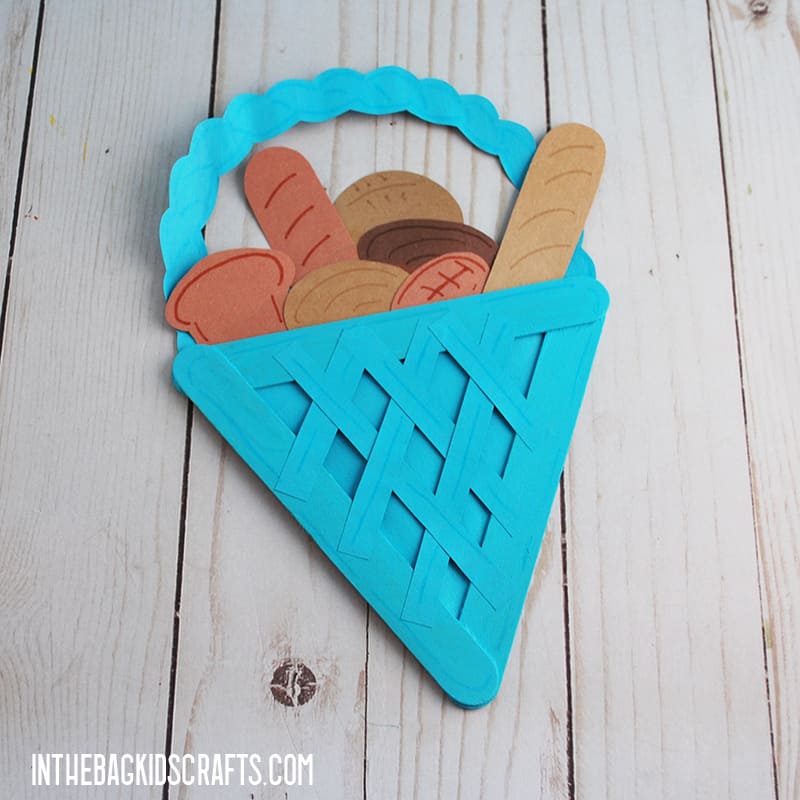
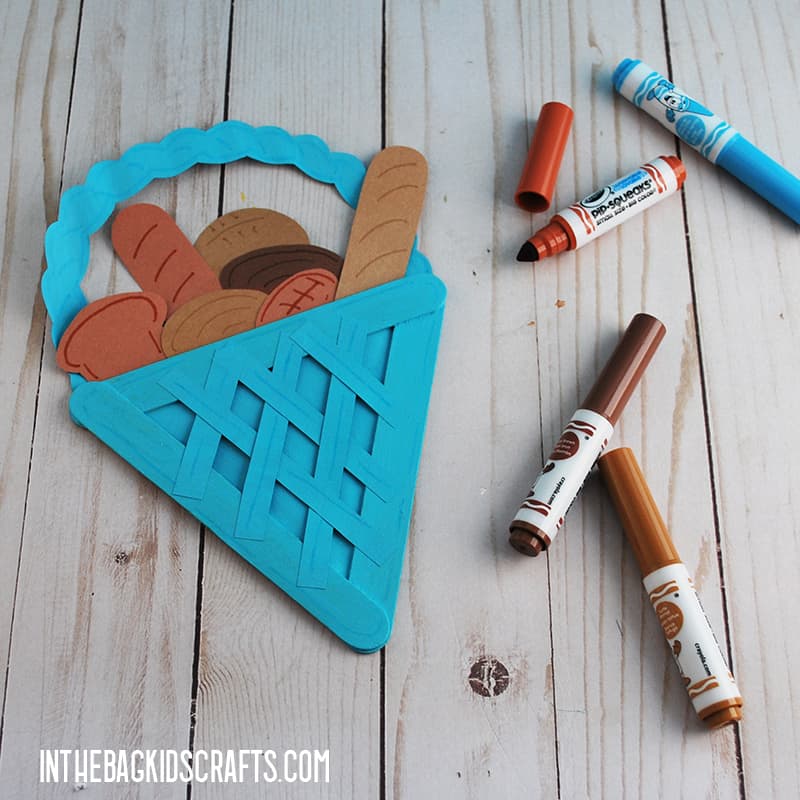
Craft #2: Basket of Goodies Craft
SUPPLIES FROM THE BAG
- 3 Large popsicle sticks
- Elmer’s glue
- Newspaper
- Clothespin
- Medium pom pom
- Light blue paint
- Construction paper (light blue and shades of brown/tan)
- Scissors
- Glue stick
- Markers
- Pencil
- Basket printable template
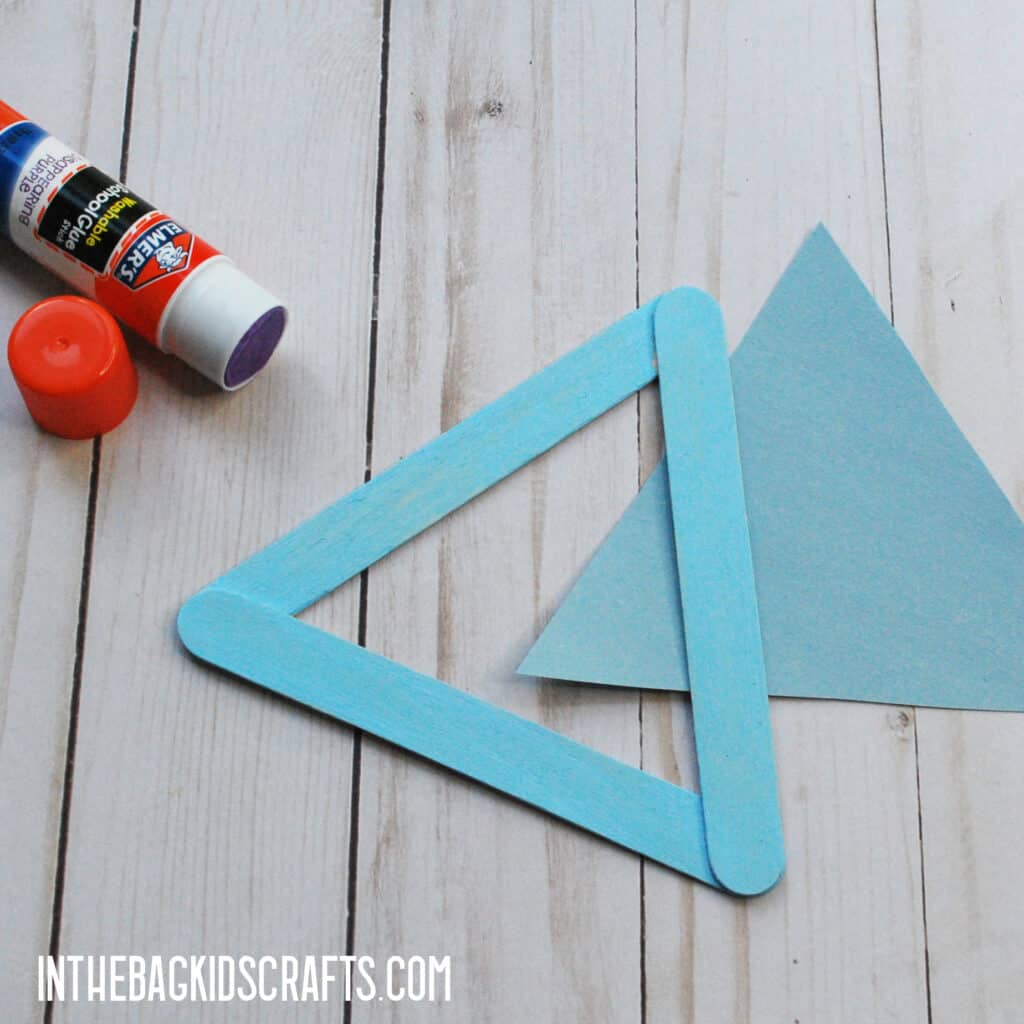
Step 1: Make the Triangle
- Use the Elmer’s glue to attach 3 large popsicle sticks, forming a triangle frame.
- Set the triangle to the side and allow the glue to dry thoroughly.
*This is a step that you may want to do the day before and let them sit overnight so that the glue dries completely. While you are at it, make lots of triangle frames so that you are ready to make as many crafts as you want! (And, believe me, you are going to want to make them all and then some!)
Step 2:
- Place the triangle frame on the newspaper and squeeze out some light blue paint
- Pinch the pompom with the clothespin to form a “paint brush”
- Paint the triangle frame light blue and set it aside to allow the paint to dry
- I also painted a piece of paper in the same shade of blue because the blue paper that I had did not match the paint closely enough. Also set this aside to dry.
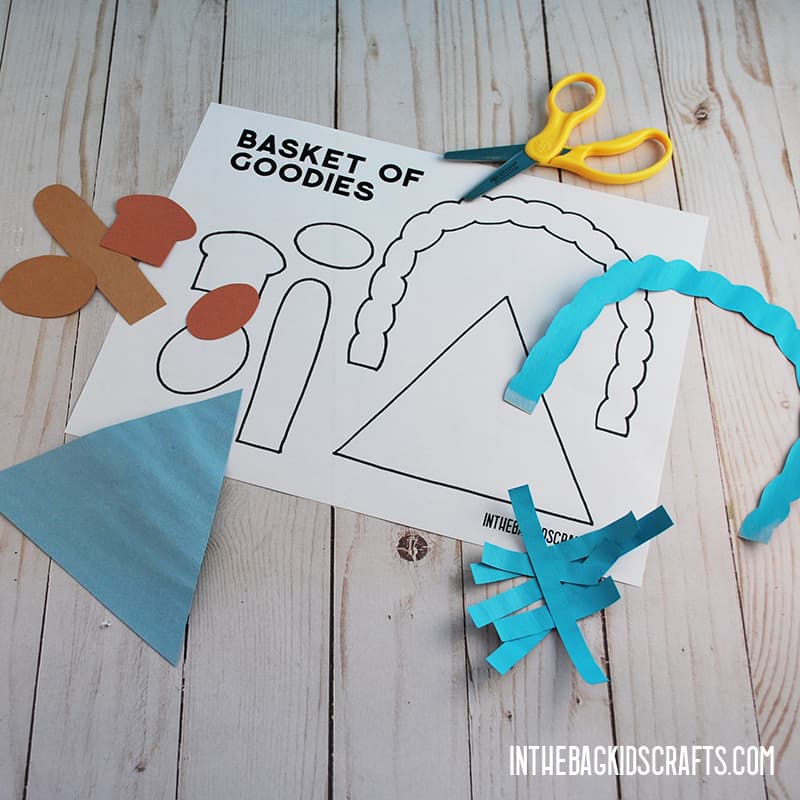
Step 3: Use the Red Riding Hood Basket Template
- Print the free Red Riding Hood Basket of Goodies template.
- Then cut some thin strips of blue construction paper to weave on the basket.
- Trace each part onto the colored construction paper. Use the photo as a guide for what colors to use.
*If you do not have access to a printer, you can look at the craft or the template and draw the pieces free-hand to cut out.
Step 4: Put It Together
- Use the glue stick to adhere the blue paper triangle onto the back of the popsicle stick frame.
- Then add your handle and goodies to the basket.
- Finally, weave the thin strips of paper onto the front of the basket, trimming them to size as needed.
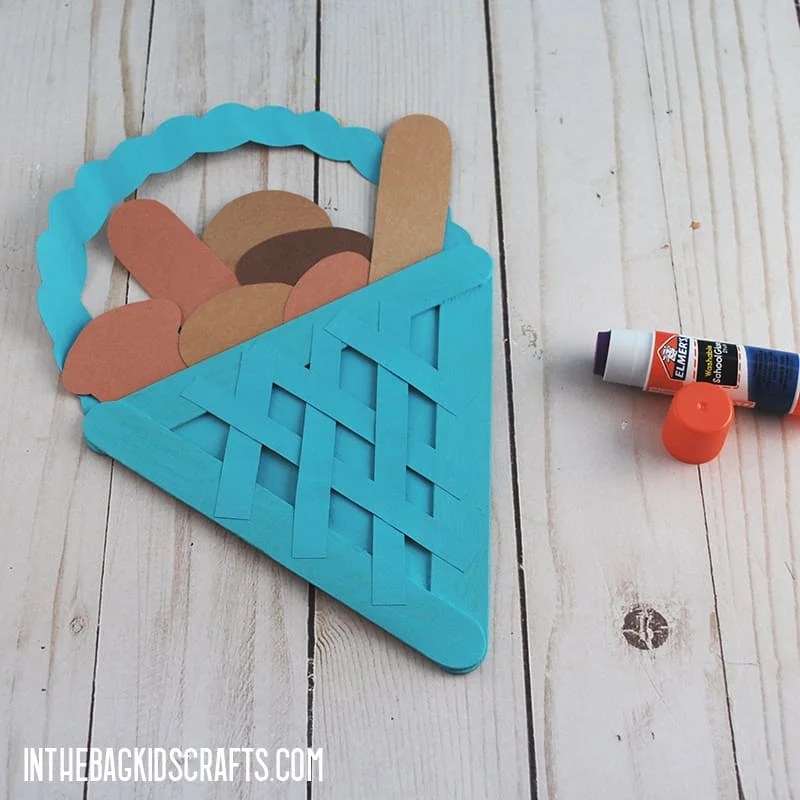
Step 5: Add the Details
- Use your markers to add some highlights and details to the items in the basket and the basket itself. I wish that I had cut a little piece of paper and drawn on red and white checks to imitate a cloth hanging out of the basket. Maybe you can add this detail…or really anything that you want. This is YOUR craft…make it your own.
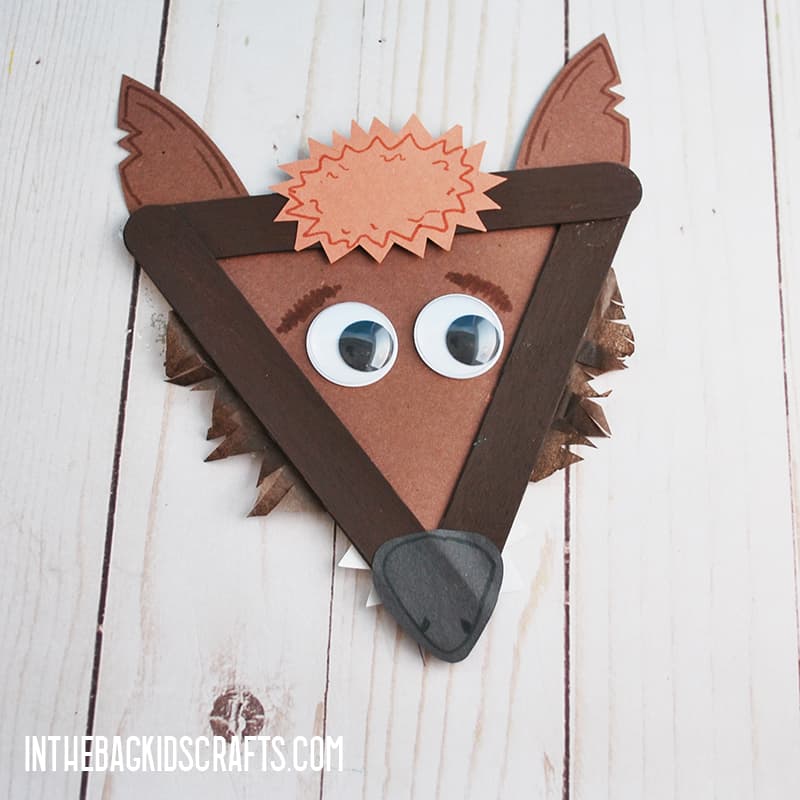
Craft #3: Big Bad Wolf Craft
SUPPLIES FROM THE BAG
- 3 Large popsicle sticks
- Elmer’s glue
- Newspaper
- Clothespin
- Medium pompom
- Brown paint
- Brown tissue paper (cut into 1″ pieces)
- Construction paper (shades of brown, black and white)
- Scissors
- Glue stick
- Markers
- 2 Large googly eyes (self-adhesive)
- Pencil
- Big Bad Wolf Printable Template
Step 1: Make the Triangle
- Use the Elmer’s glue to attach 3 large popsicle sticks, forming a triangle frame
- Set the triangle to the side and allow the glue to dry thoroughly
*This is a step that you may want to do the day before and let them sit overnight so that the glue dries completely. While you are at it, make lots of triangle frames so that you are ready to make as many crafts as you want! (And, believe me, you are going to want to make them all and then some!)
Step 2: Paint the Wolf Craft frame
- Place the triangle frame on the newspaper and squeeze out some brown paint
- Pinch the pompom with the clothespin to form a “paint brush”
- Paint the triangle frame brown and set it aside to allow the paint to dry.
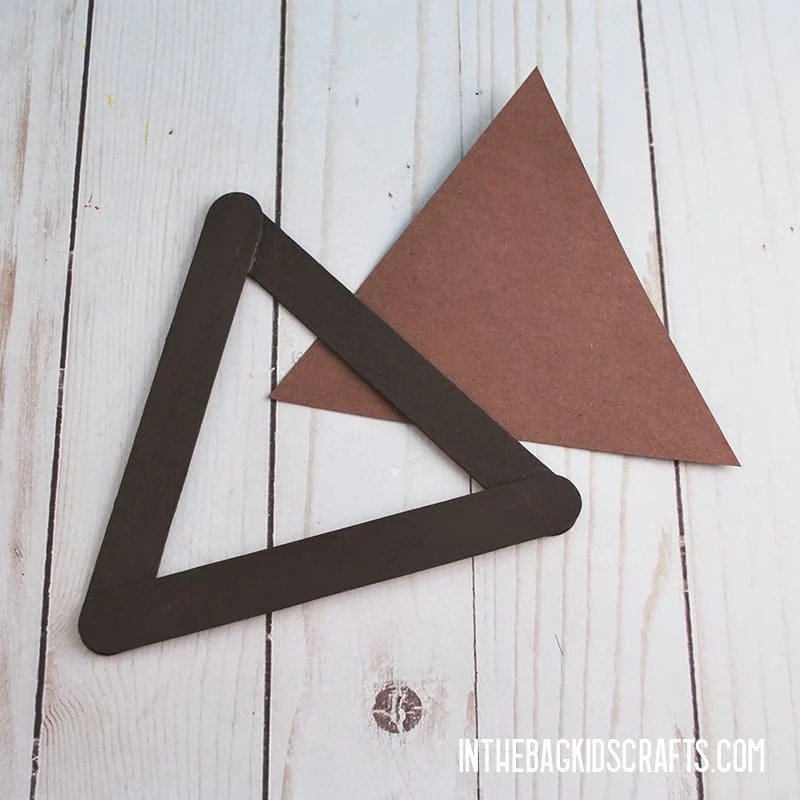
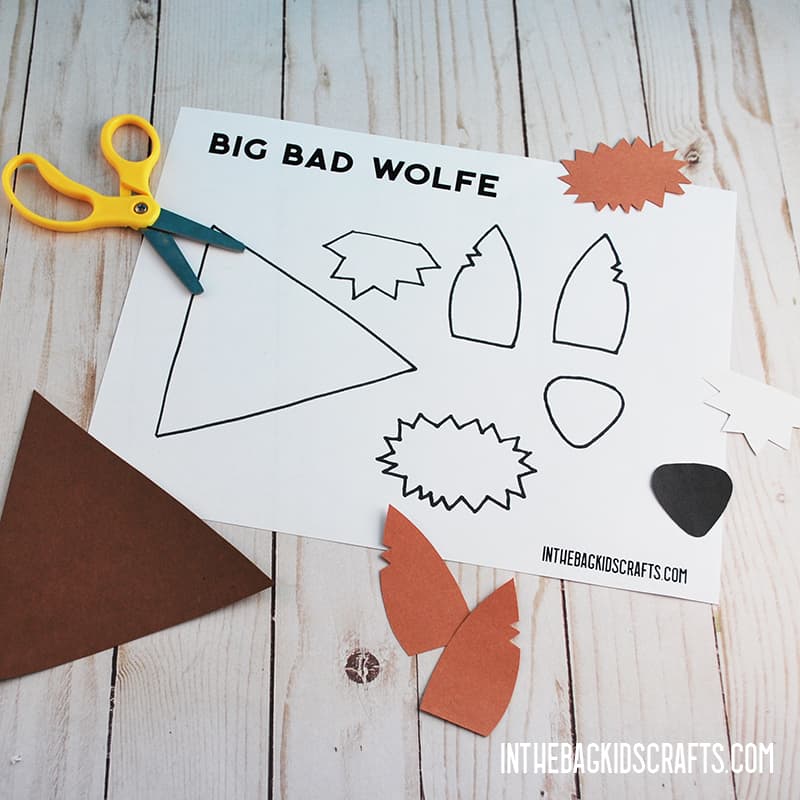
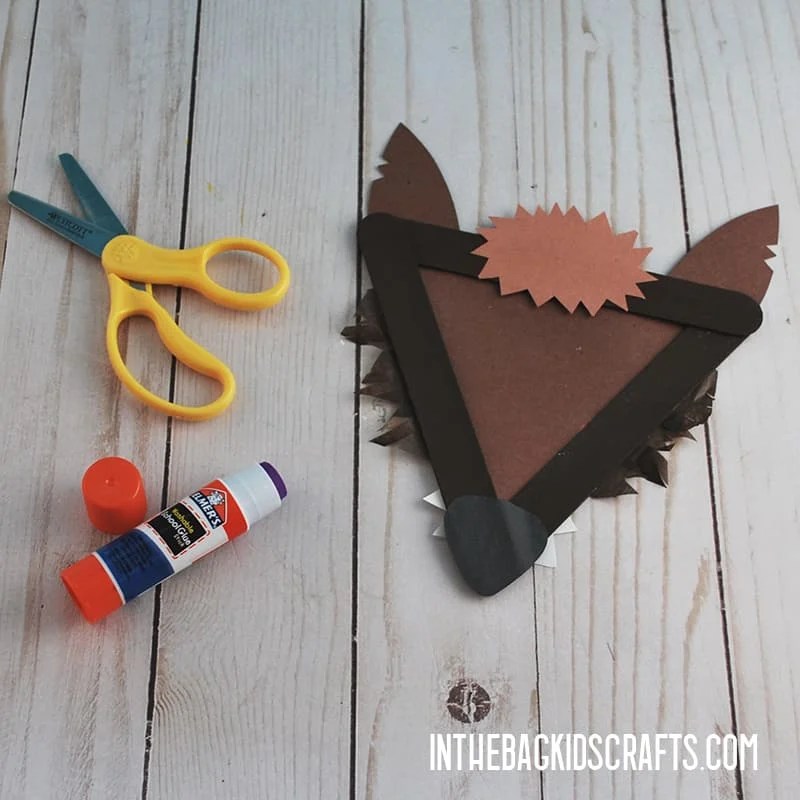
Step 3: Use the Big Bad Wolf Template
- Print the free Big Bad Wolf template.
- Trace each part onto the colored construction paper. Use the photo as a guide for what colors to use.
*If you do not have access to a printer, you can look at the craft or the template and draw the pieces free-hand to cut out.
Step 4: Put It Together
- Use the glue stick to adhere the brown paper triangle onto the back of the popsicle stick frame.
- Then add the other parts of your Big Bad Wolf craft to the triangle.
- Finally, use the glue stick to attach 2-3 squares of brown tissue paper onto the sides of your wolf’s face.
- Snip at the brown tissue paper so that it is in a zig zag and fringed.
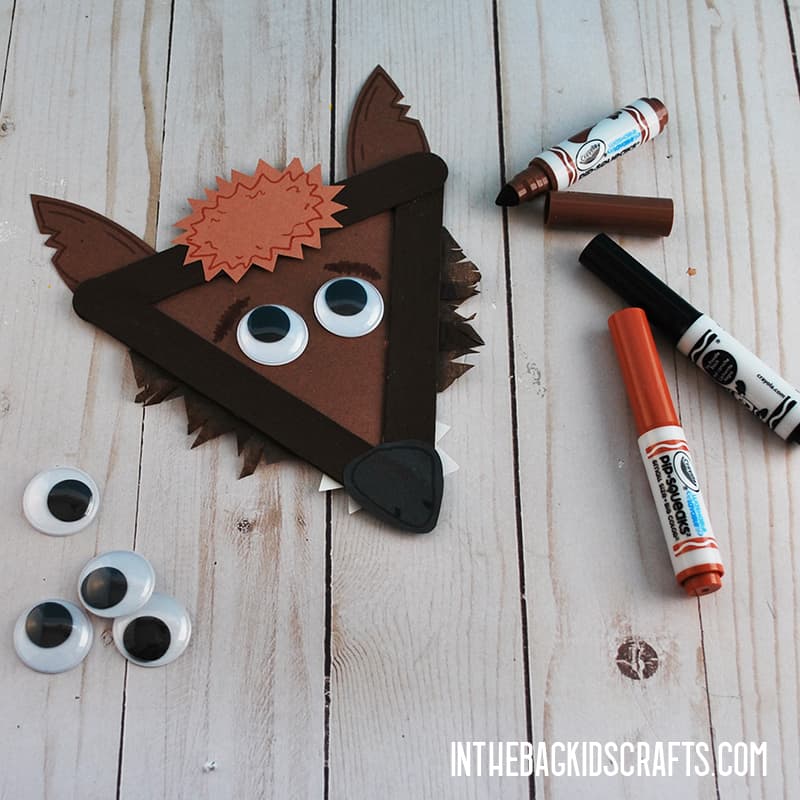
Step 5: Add the Details
- First, put the Wolf’s eyes in place.
- Then draw on the rest of his face.
- Use your markers to add some highlights and details to your Big Bad Wolf, like fuzzy eyebrows and some “fuzz” on his ears.
Craft #4: Red’s Granny Craft
SUPPLIES FROM THE BAG
- 3 Large popsicle sticks
- Elmer’s glue
- Newspaper
- Clothespin
- Medium pompom
- Flesh colored paint (whatever skin tone you choose)
- Construction paper (flesh toned to match paint, pink, and gray)
- Scissors
- Glue stick
- Markers
- 2 Googly eyes (self-adhesive)
- Pencil
- Granny printable template
Step 1: Make the Triangle
- Use the Elmer’s glue to attach 3 large popsicle sticks, forming a triangle frame
- Set the triangle to the side and allow the glue to dry thoroughly
*This is a step that you may want to do the day before and let them sit overnight so that the glue dries completely. While you are at it, make lots of triangle frames so that you are ready to make as many Little Red Riding Hood crafts as you want! (And, believe me, you are going to want to make them all and then some!)
Step 2: Paint the Granny Craft frame
- Place the triangle frame on the newspaper and squeeze out some flesh toned paint
- Pinch the pompom with the clothespin to form a “paint brush”
- Paint the triangle frame flesh colored and set it aside to allow the paint to dry.
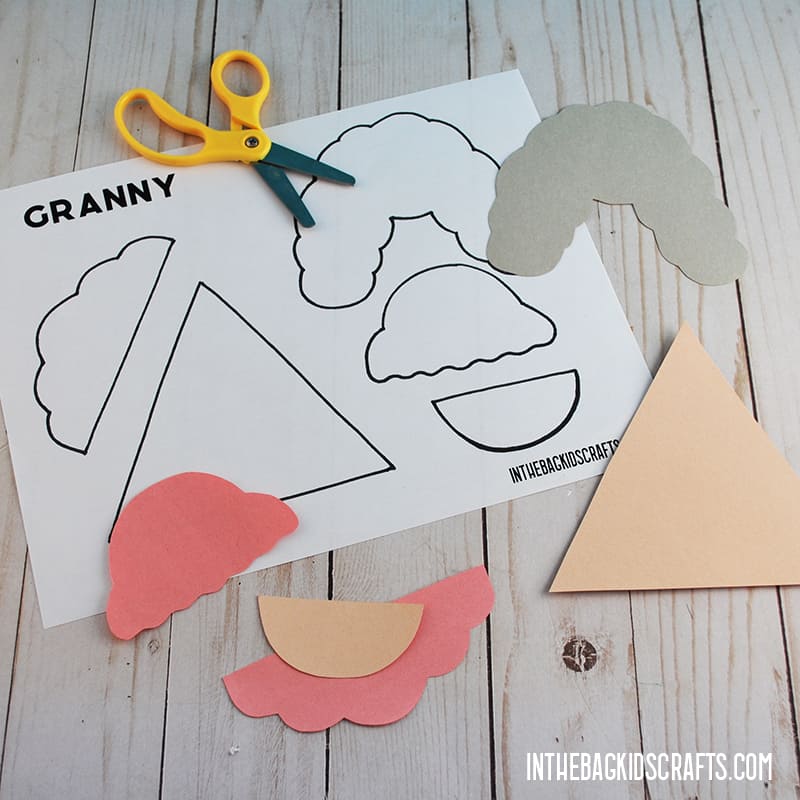
Step 3: Use the Red Riding Hood’s Granny Template
- Print the free Granny template.
- Trace each part onto the colored construction paper. Use the photo as a guide for what colors to use.
*If you do not have access to a printer, you can look at the craft or the template and draw the pieces free-hand to cut out.
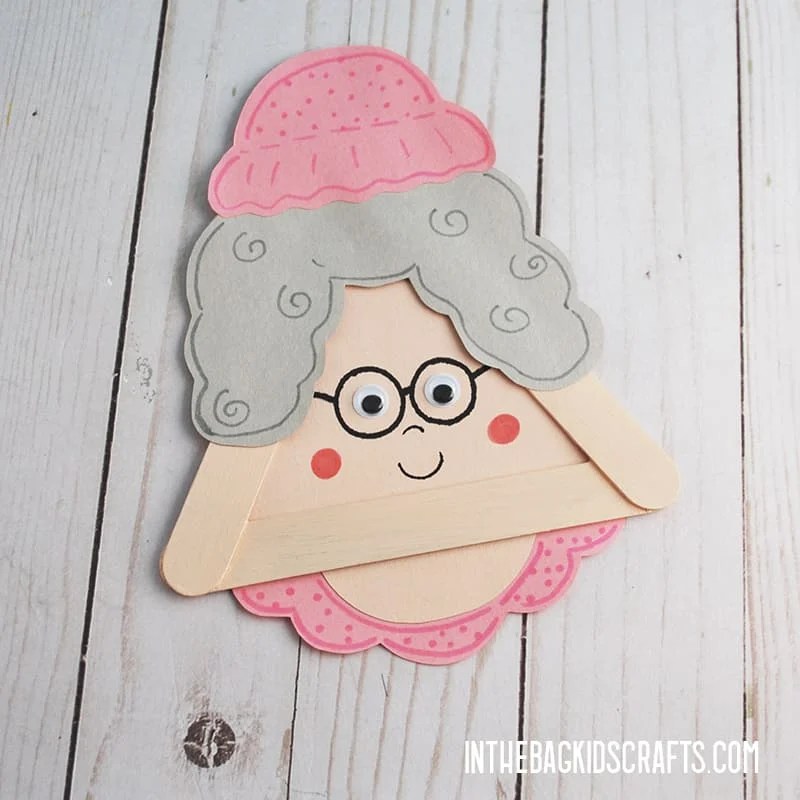
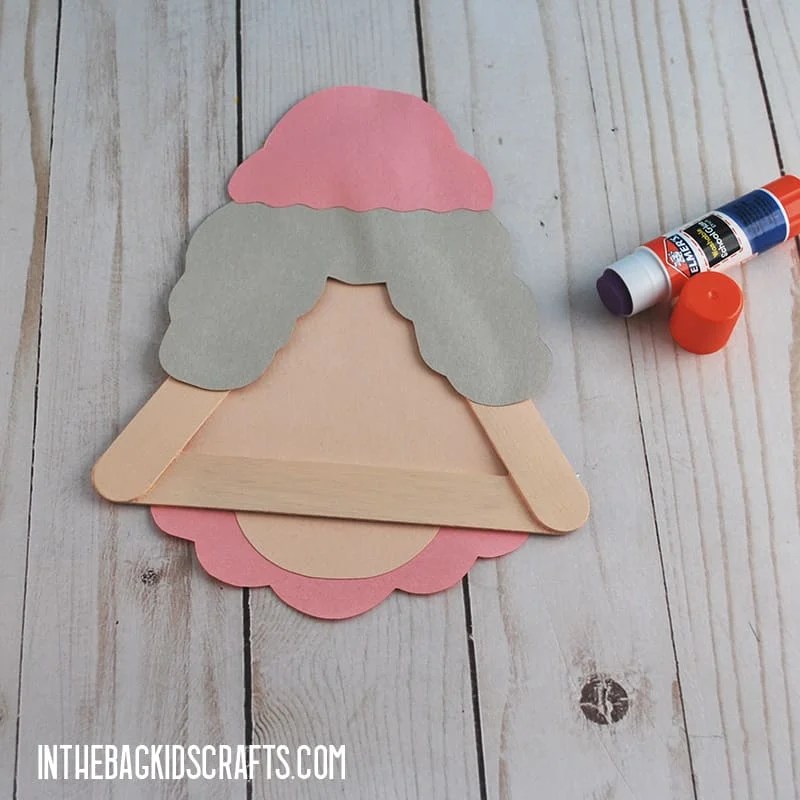
Step 4: Put It Together
- Use the glue stick to adhere the flesh colored paper triangle onto the back of the painted popsicle stick frame.
- Then add the other parts of your Granny craft to the triangle. Again, use the photos as a reference.
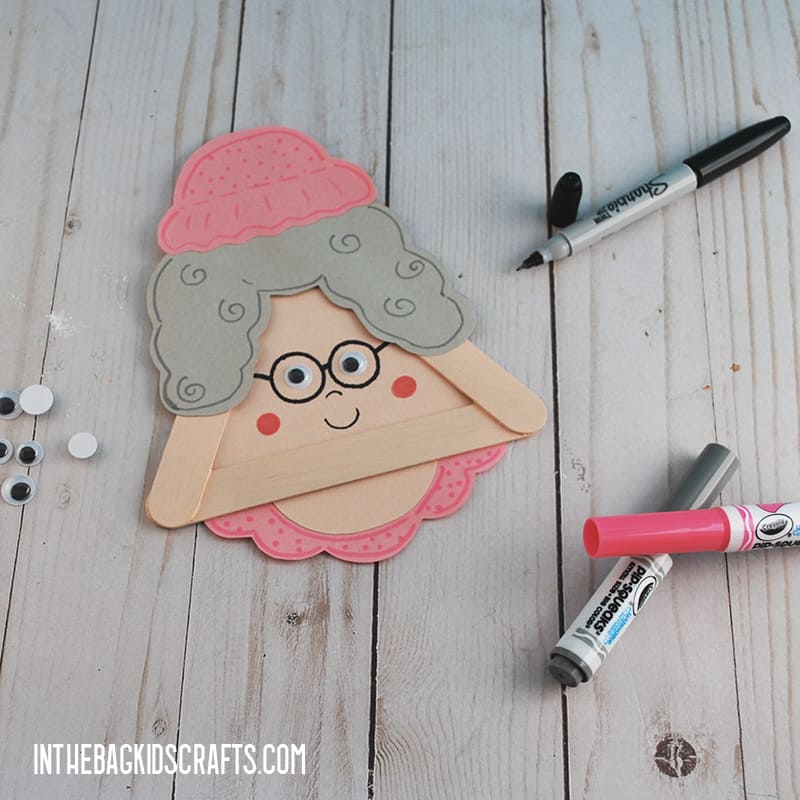
Step 5: Add the Details
- First, put Granny’s eyes in place.
- Then draw on the rest of her face, including some eye glasses.
- Use your markers to add some highlights and details to your Granny craft, like curls in the hair, polka dots on his night hat, or whatever you want.
Craft #5: Lumberjack Craft
SUPPLIES FROM THE BAG
- 3 Large popsicle sticks
- Elmer’s glue
- Construction paper (flesh colored tone of your choice, brown, black and red)
- Scissors
- Glue stick
- Markers
- 2 Googly eyes (self-adhesive)
- Pencil
- Lumberjack template
Step 1: Make the Triangle
- Use the Elmer’s glue to attach 3 large popsicle sticks, forming a triangle frame
- Set the triangle to the side and allow the glue to dry thoroughly
*This is a step that you may want to do the day before and let them sit overnight so that the glue dries completely. While you are at it, make lots of triangle frames so that you are ready to make as many crafts as you want! (And, believe me, you are going to want to make them all and then some!)
Step 2: Use the Lumberjack Template
- Print the free Lumberjack template.
- Trace each part onto the colored construction paper. Use the photo as a guide for what colors to use.
*If you do not have access to a printer, you can look at the craft or the template and draw the pieces free-hand to cut out.
Step 3: Put It Together
- First, use the glue stick to adhere the flesh colored triangle onto the back of the popsicle stick triangle frame.
- Then, adhere the other parts of the Lumberjack with your glue stick, using the picture as a reference.
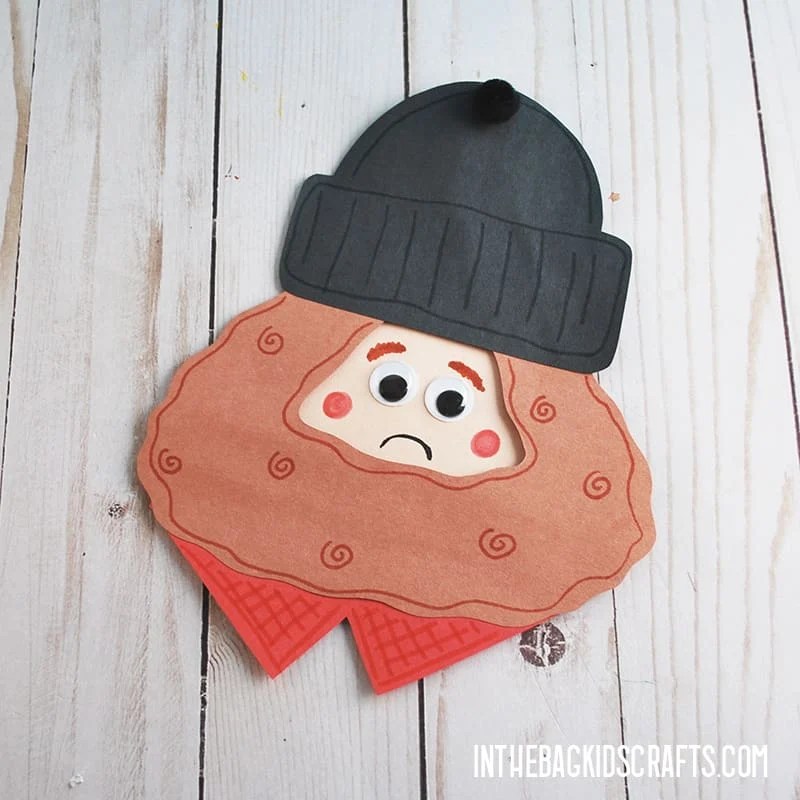
Step 4: Add the Details
- First, put the Lumberjack’s eyes in place.
- Next, draw on his face.
- Add other details as you would like. For example, I gave him some curls in his beard, plaid on his color and some details on the wool hat.
- Optional: glue a little black pom pom onto the top of the Lumberjack’s cap.
And we can’t make these Red Riding Hood Crafts without wanting to read the story too…


Save these Little Red Riding Hood Puppets for later. Pin to your favorite Pinterest board…
Now that you know how to make all of these fun Little Red Riding Hood crafts, stray from the pictures and really make them your own. You might have noticed that the books listed here are not all the traditional story. There is more than one way to tell a fairy tale…and there is more than one way to make these crafts. Use your imagination and make them your own. Plus, you can add a popsicle stick handle to make them easier to use as puppets if you want.
Happy Craftin!
XO Joy