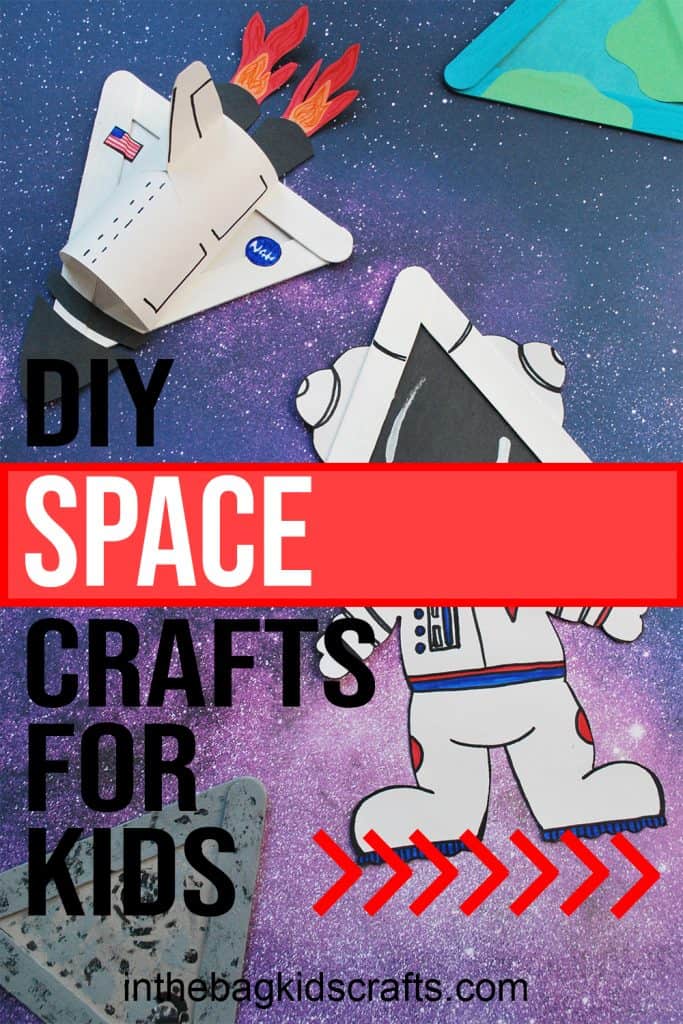
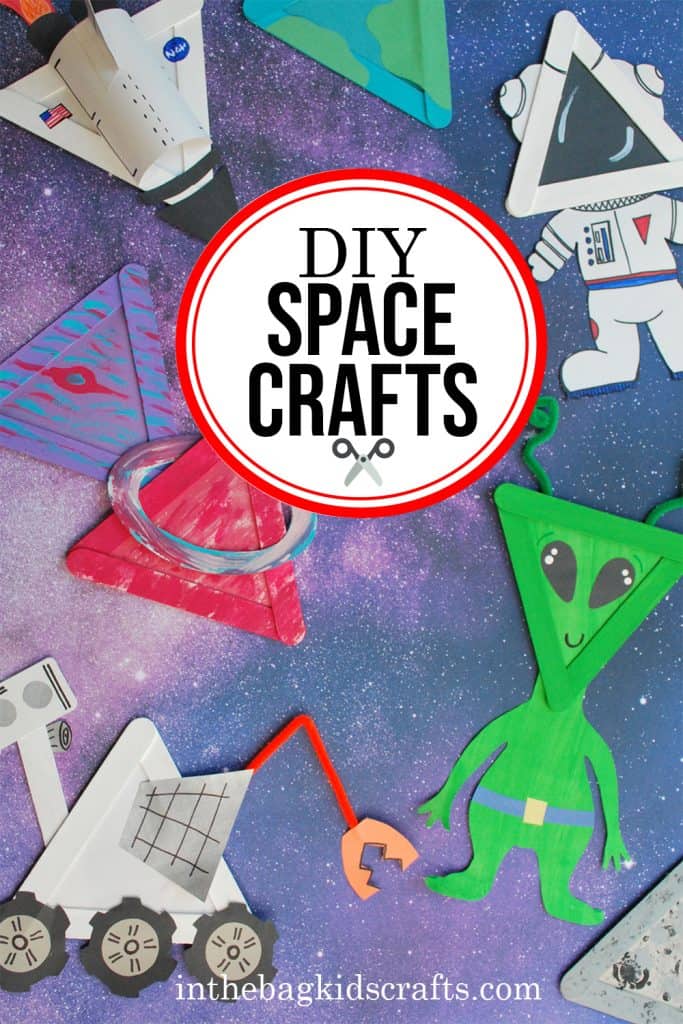
Space Crafts for Kids
It is truly my belief that the best crafts are the most basic. And what is more basic than a triangle? Starting with this basic shape, you can find a million ways to create something unique and fun. And today, we are going to make DIY space crafts that are “out of this world”!
Seriously, I am so excited about this and cannot wait to see your versions of the astronaut, alien, space shuttle, space rover and planets and moons. And making these easy crafts are just the beginning of the space activities that you can explore with these creations.
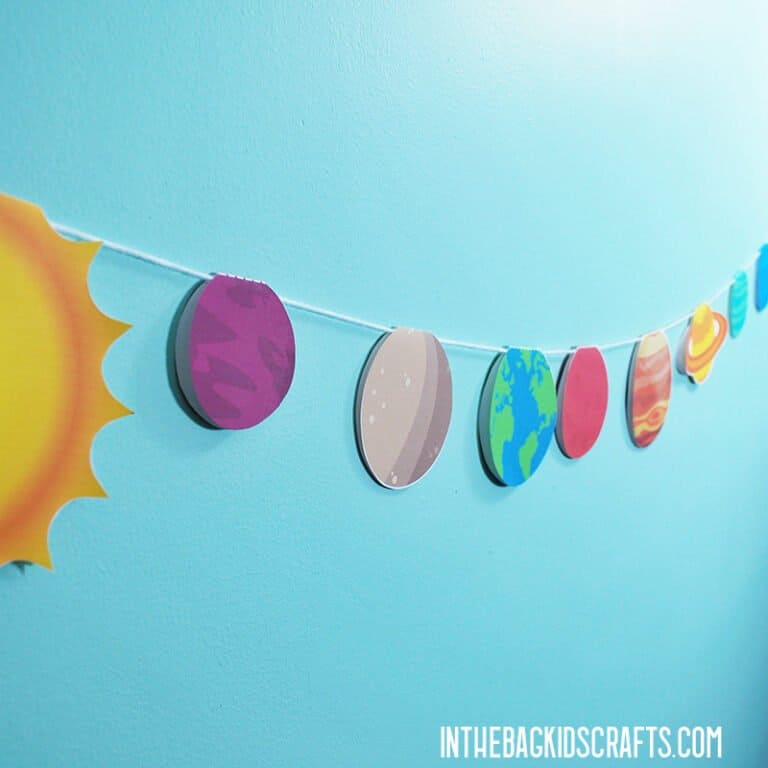
These space crafts for kids pair perfectly with our DIY Solar System Craft Mobile , 10 Space Crafts for Kids and this Paper Plate Spaceship Craft. Together, they create a fun hands-on way to learn about planets, astronauts, rockets, and the wonders of outer space. For even more creative fun, try our BB8 Craft with Moving Parts and build an entire space-themed craft collection that’s perfect for home, school, or a solar system unit.
Skills These Space Crafts Build
- fine motor skills
- creativity
- problem-solving
- scissor skills
- following directions
Best Ages for These Space Crafts
Preschool
Many of these space crafts can be adapted for preschoolers with a little adult assistance. Young children will enjoy exploring planets, rockets, astronauts, and other outer space themes while practicing fine motor skills, creativity, and following simple directions.
Kindergarten
Kindergarten students can complete many of these space crafts independently or with minimal help. These activities are a fun way to reinforce lessons about the solar system, planets, and space exploration while encouraging creativity and hands-on learning.
Elementary
Elementary-aged children can use these space crafts to dive deeper into science and astronomy topics. They may enjoy adding extra details, creating imaginative space scenes, or incorporating what they have learned about planets, stars, and astronauts into their projects.
Classroom Uses
- Space unit
- Solar system lesson
- STEM activities
- Astronomy theme
- Science centers
Space Craft Ideas Included
- rocket craft
- alien craft
- astronaut craft
- planet craft
- UFO craft
- moon craft
Fun Facts about Space…
Learning about space is even more fun when you know a few amazing facts! Share these space facts with kids while making your favorite space crafts. Check out National Geographic Facts for Kids!
- A Day on Venus Is Longer Than a Year – Venus rotates very slowly. It takes longer for Venus to spin around once than it does to travel around the Sun!
- Footprints Can Last for Millions of Years on the Moon – Because the Moon has no wind or rain, footprints left by astronauts can remain there for a very long time.
- Jupiter Is the Largest Planet – Jupiter is the biggest planet in our solar system. More than 1,000 Earths could fit inside Jupiter.
- There Are Billions of Stars – Scientists estimate that there are billions of stars in our galaxy alone, and billions of galaxies throughout the universe.
- The Sun Is a Star – Even though it looks different from the stars we see at night, the Sun is actually a star. It is the center of our solar system and provides the light and heat that make life on Earth possible.
Books to Pair With These Space Crafts!!!


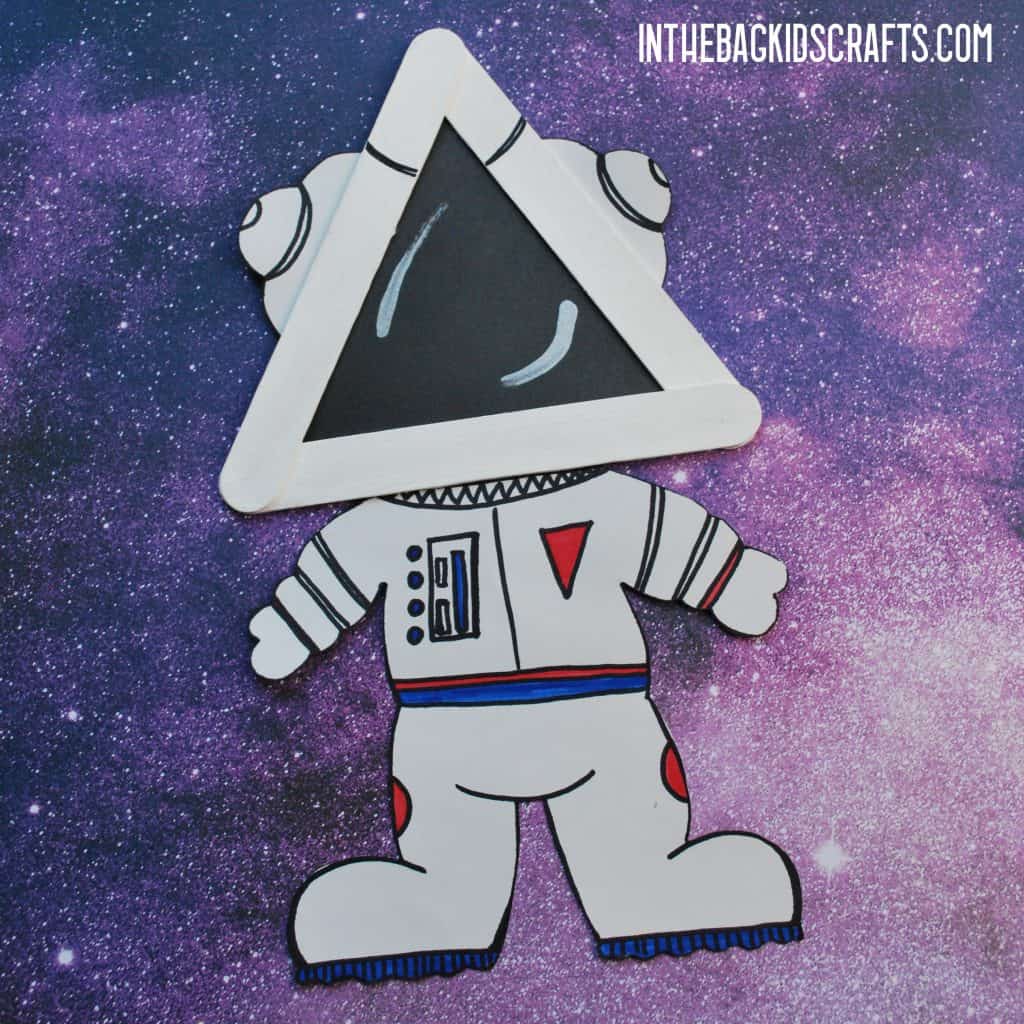
Project 1: Astronaut Craft for Kids
All activities require adult supervision. By using this site, you are agreeing to our terms of use. This post may contain affiliate links. If you choose to purchase through these links, I may earn a small commission at no additional cost to you. These commissions help support our site and allow us to continue creating free craft ideas and resources. I only share products I personally use or genuinely recommend. Click here to read my full disclosure policy.
We’re so glad to have you here at In the Bag Kids’ Crafts! Our mission is to help you make crafting with your kiddo a habit using fun, easy ideas with supplies you already have on hand.
Be sure to visit the“Fill Your Bag” page for our go-to supply list—we use it for every project to keep crafting simple, affordable, and mess-free. No extra store runs, no missing pieces—just grab your bag and start creating!
Want to make it even easier? Check out our quick shopping list on Amazon and Walmart to stock up on everything we love.
And if you use our printables, don’t miss our Favorite Printing Essentials list. We’ve found a reliable, no-hassle printer that won’t leave you dealing with constant issues or dried-out ink—plus all the extras you need so you can print and craft without the frustration.
SUPPLIES FROM THE BAG
- White construction paper
- 3 Large popsicle sticks
- Elmer’s Glue
- Scissors
- Glue stick
- White paint
- Newspaper
- Pencil
- Clothespin
- Medium pompom
- Black construction paper
- Black Sharpie marker
- Markers
- Optional: Silver paint
- Optional: Q-tip
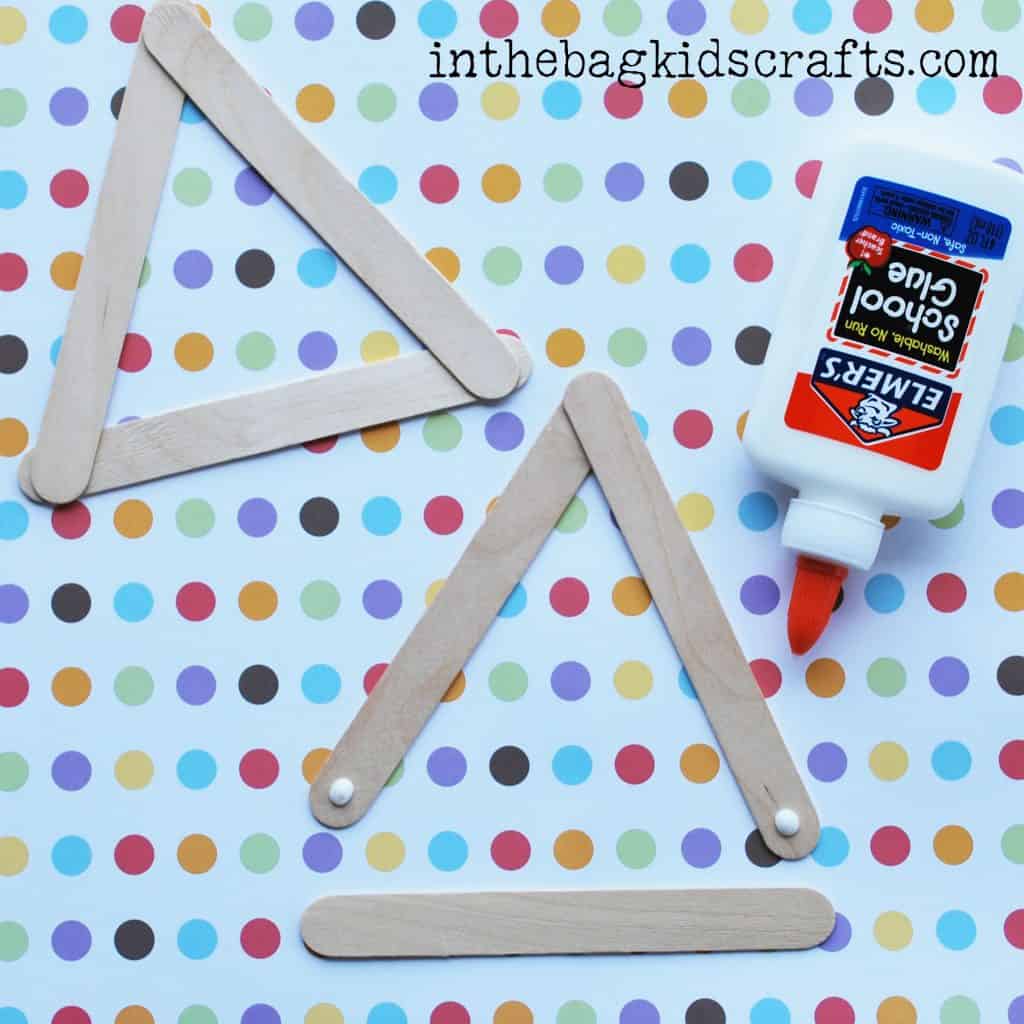
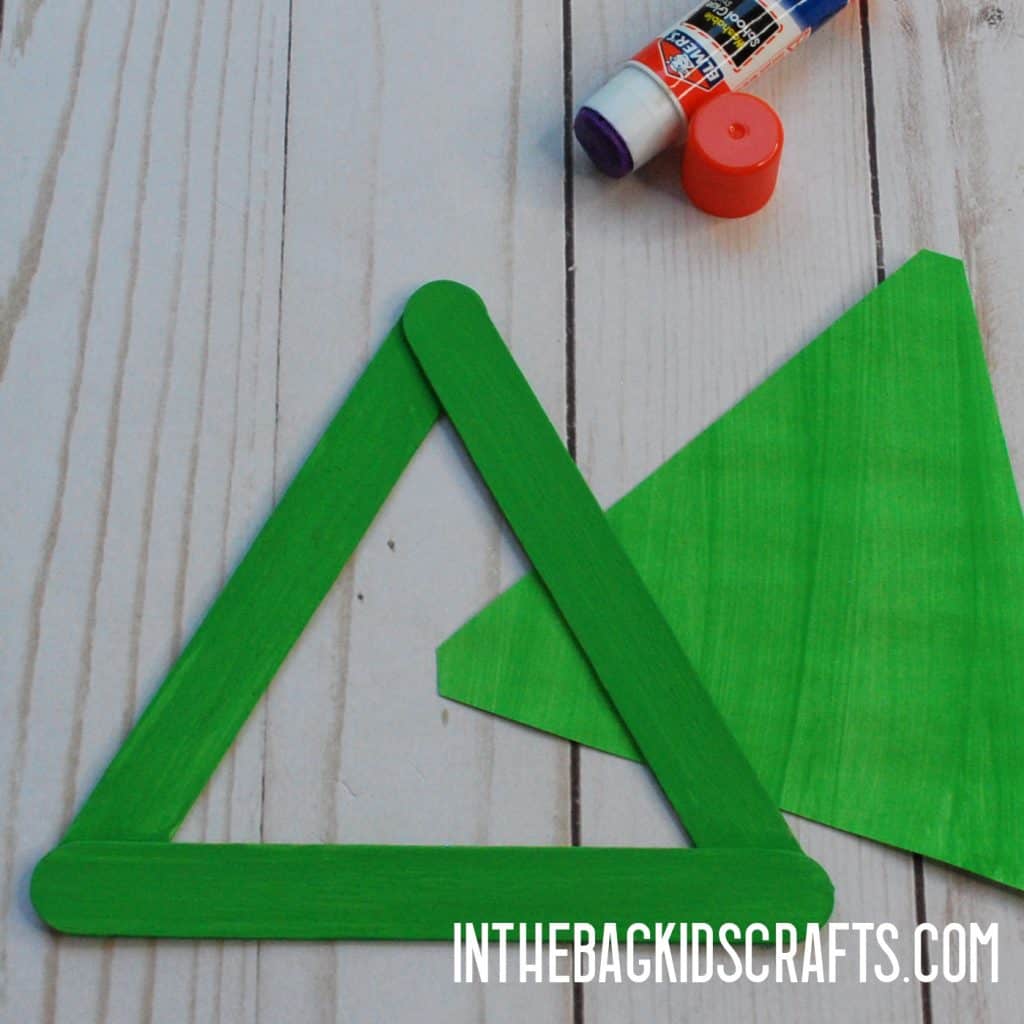
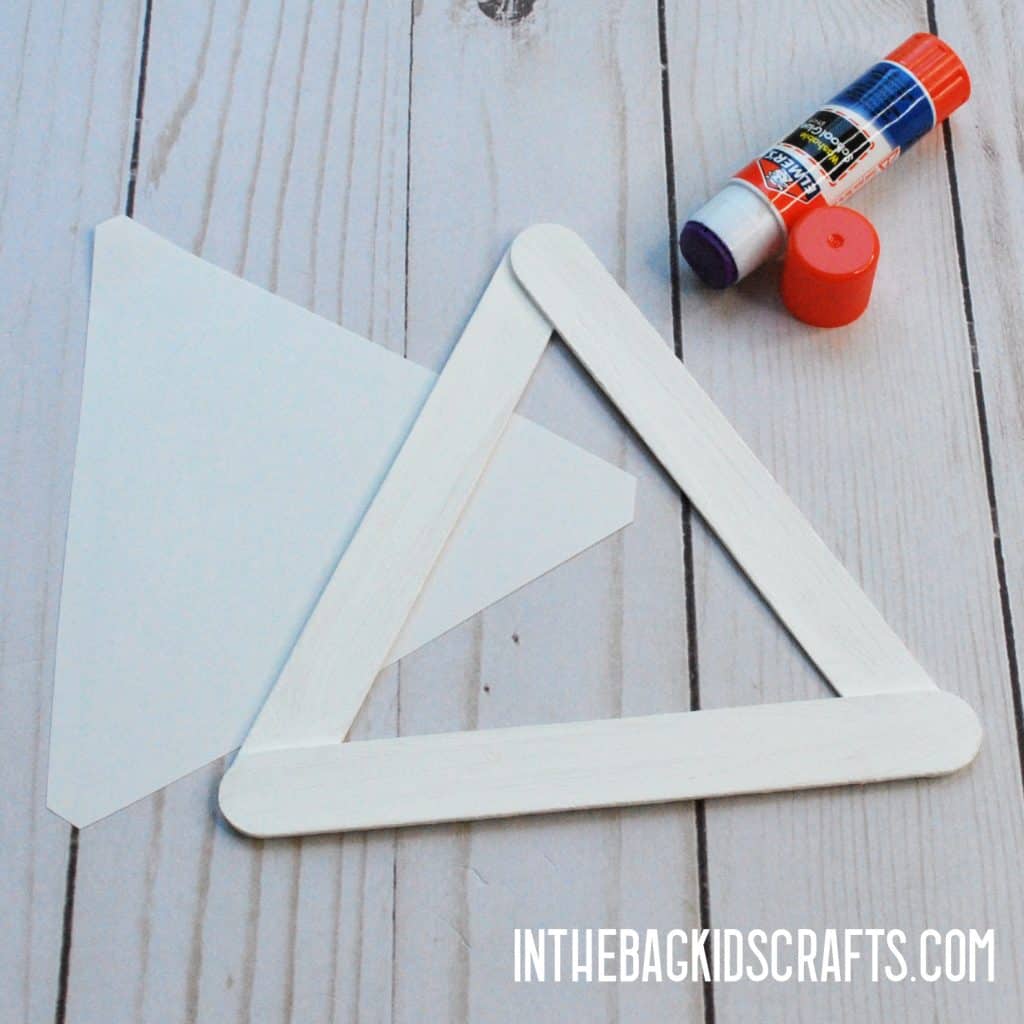
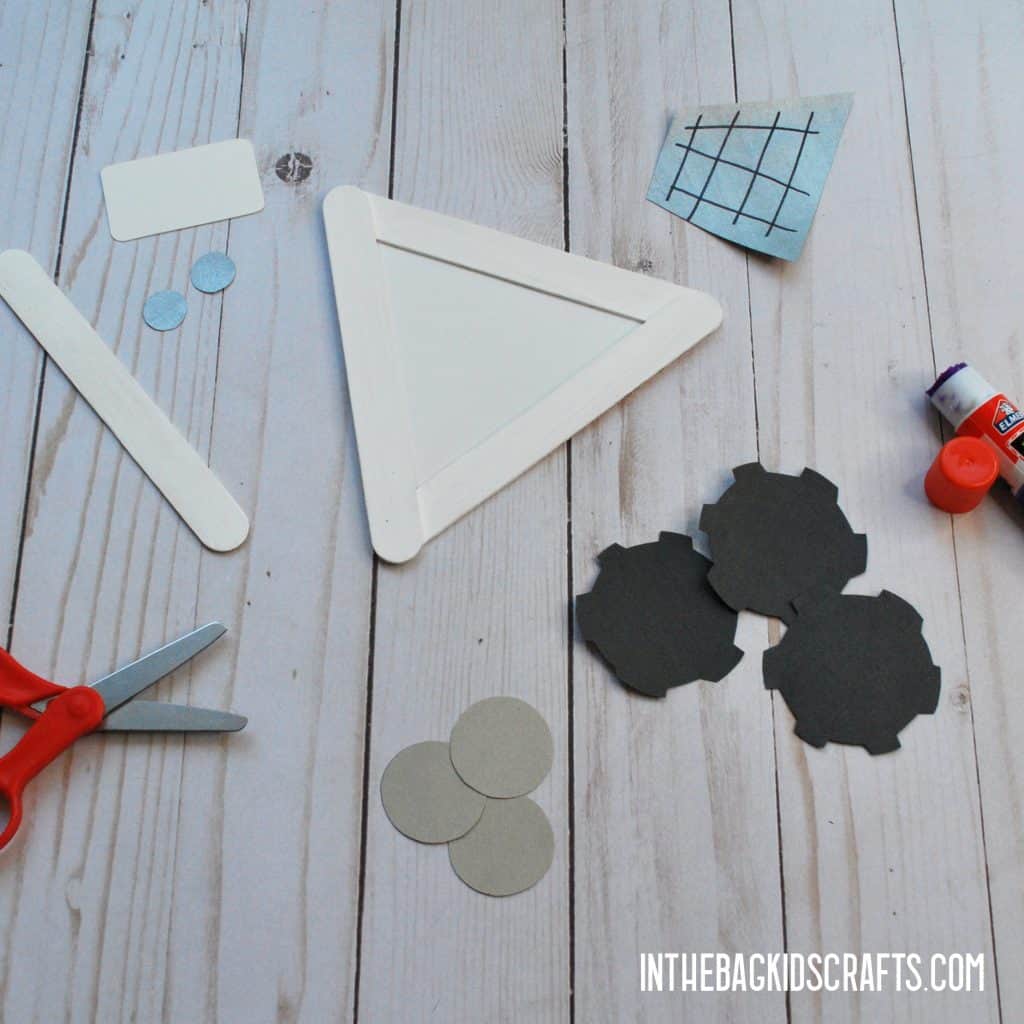
Step 1: Make the Triangle
- Use the Elmer’s glue to attach 3 large popsicle sticks, forming a triangle frame
- Set the triangle to the side and allow the glue to dry thoroughly
*This is a step that you may want to do the day before and let them sit overnight so that the glue dries completely. While you are at it, make lots of triangle frames so that you are ready to make as many Outer Space crafts as you want! (And, believe me, you are going to want to make them all!)
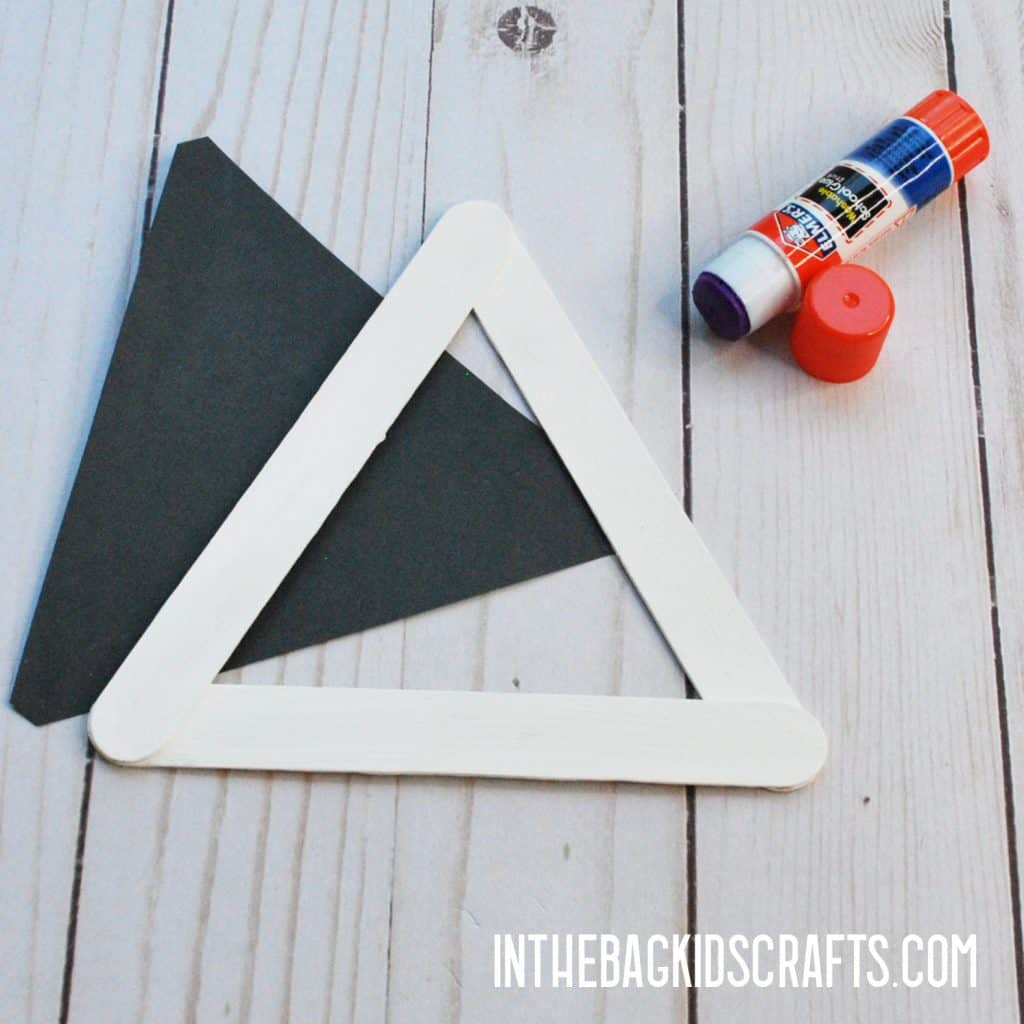
Step 2: Paint
- Place the triangle frame on the newspaper and squeeze out a little white paint
- Pinch the pompom with the clothespin to form a “paint brush”
- Paint the triangle frame white and set it aside to allow the paint to dry

Step 3: Build the Foundation
- Trace the outside of the triangle onto black paper and then draw a slightly smaller triangle about 1/4″ inside the one you have drawn…
- OR print the template (below) and trace the triangle from the template onto your black construction paper
- Glue the paper triangle onto the back of the frame
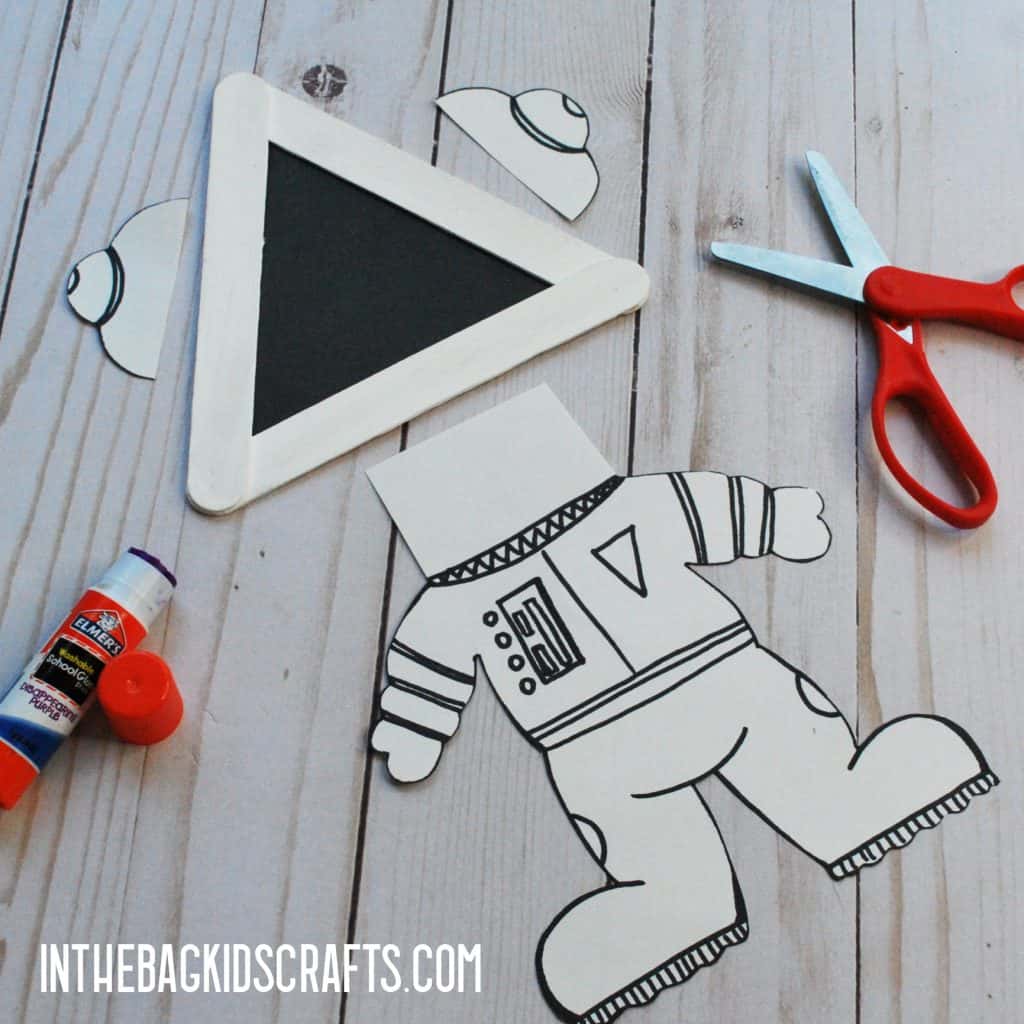
Step 4: Add the Details
- Draw the body of your astronaut and a couple of knobs for the side of his helmet…
- OR print the DIY space crafts template and cut out all of the parts
- Use your glue stick to adhere the body onto the triangle. And then put the knobs on the side of his helmet.
- Last, draw on some details with your markers. You can imitate the picture here, but I would love to see you make this astronaut all your own! Decorate him using your imagination.
- Optional: Use the q-tips and some silver (or white) paint to add some reflections onto the face of your astronaut’s helmet shield.
*You can also make this astronaut using orange (or any other color your choose) instead of white.
Project 2: Alien Craft for Kids
*Scroll to the end of this set of instructions to see the full video of tutorial for this space alien craft. My young friend, John, joined me in the studio to help demonstrate.
SUPPLIES FROM THE BAG
- 3 Large popsicle sticks
- Elmer’s glue
- Newspaper
- Clothespin
- Medium pompom
- Green paint
- Green construction paper
- Scraps of black construction paper
- Glue stick
- Black Sharpie Marker
- Scissors
- Green pipe cleaner
- Scotch tape
- Alien craft template
Step 1: Make the Triangle
- Use the Elmer’s glue to attach 3 large popsicle sticks, forming a triangle frame
- Set the triangle to the side and allow the glue to dry thoroughly
*This is a step that you may want to do the day before and let them sit overnight so that the glue dries completely. While you are at it, make lots of triangle frames so that you are ready to make as many Outer Space crafts as you want! (And, believe me, you are going to want to make them all!)
Step 2: Paint
- Place the triangle frame on the newspaper and squeeze out a little green paint
- Pinch the pompom with the clothespin to form a “paint brush”
- Paint the triangle frame green and set it aside to allow the paint to dry
*If you do not have green paper that matches the green paint that you want to use for your alien, paint some paper too to match the frame. Just be sure to put a thin coat on the paper so that it does not get too wavy as it dries.
*And if you don’t want to get out the paint, use crayons or markers to color the frame instead.
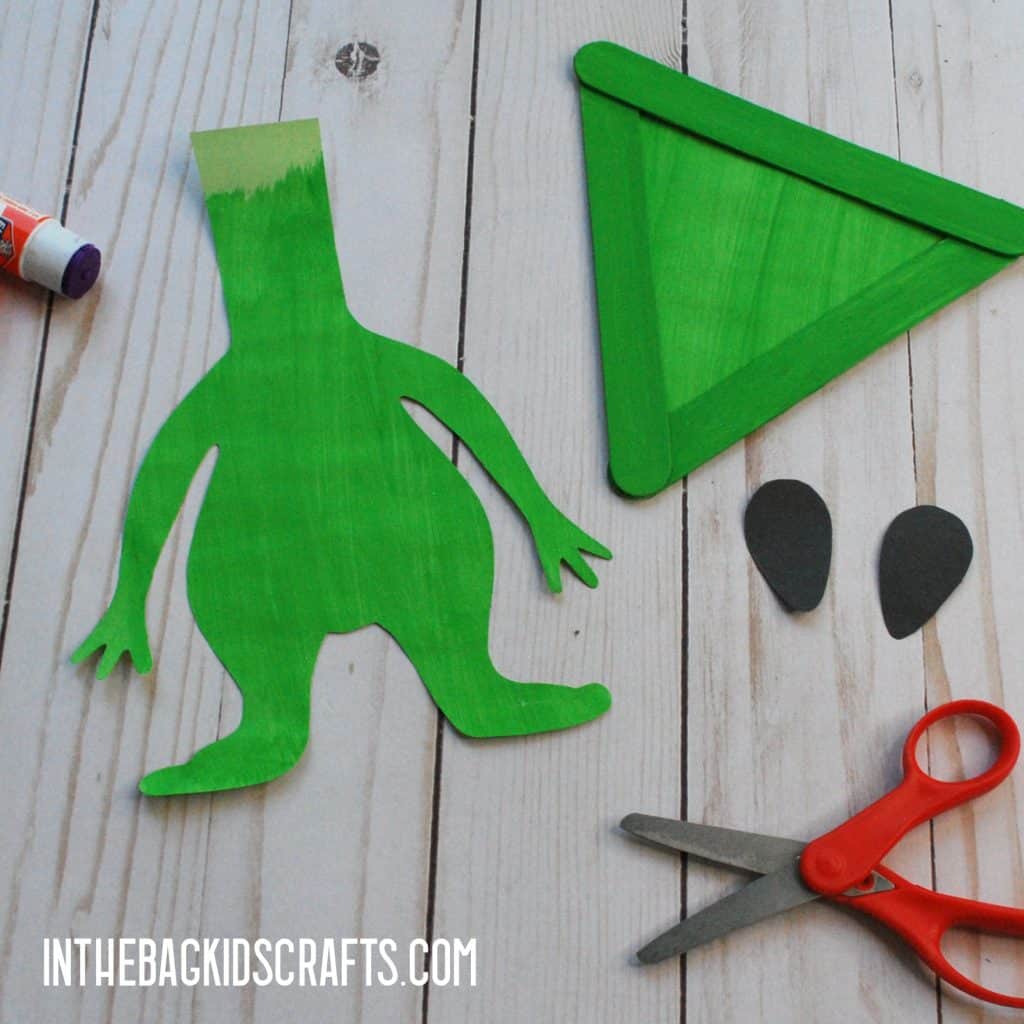
Step 3: Build the Foundation
- Trace the outside of the triangle onto green paper and then draw a slightly smaller triangle about 1/4″ inside the one you have drawn…
- OR print the free template and trace the triangle from the template onto your green construction paper
- Glue the paper triangle onto the back of the frame
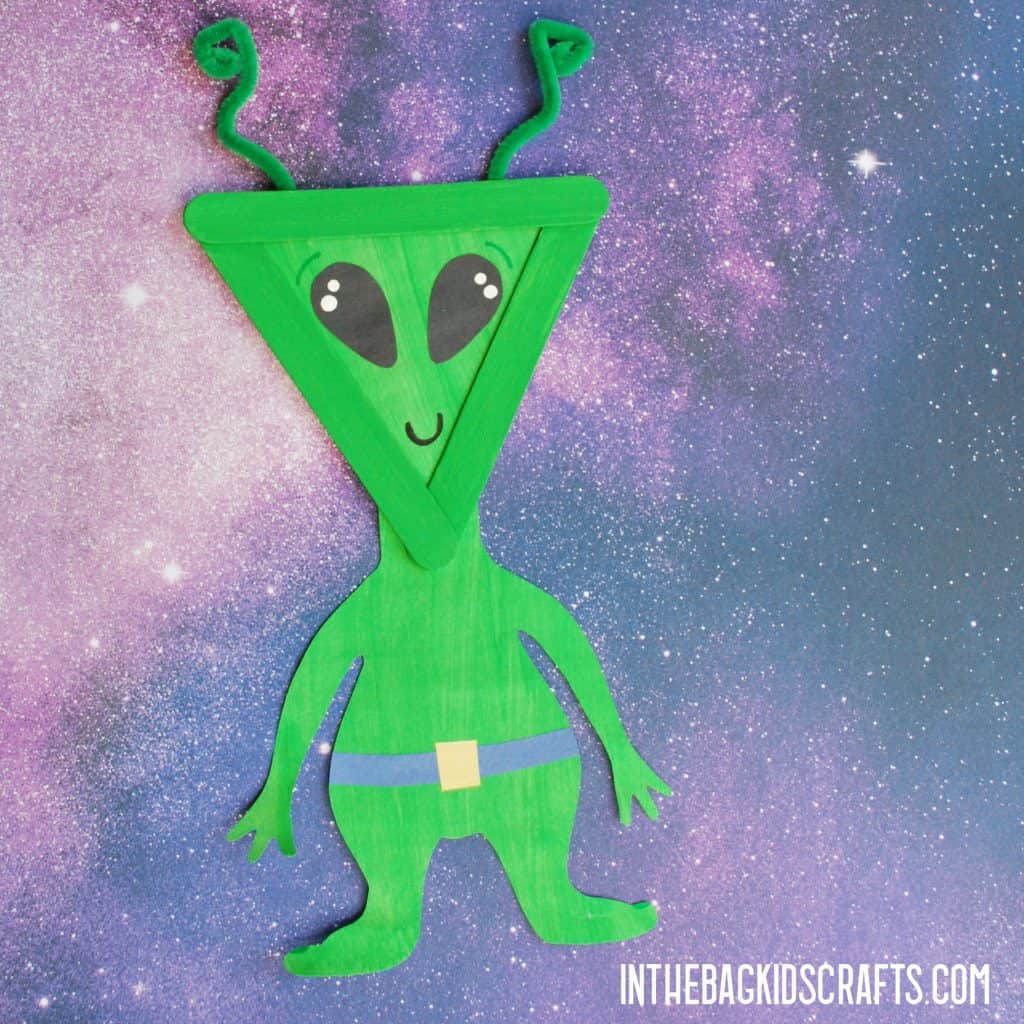
Step 4: Add the Details
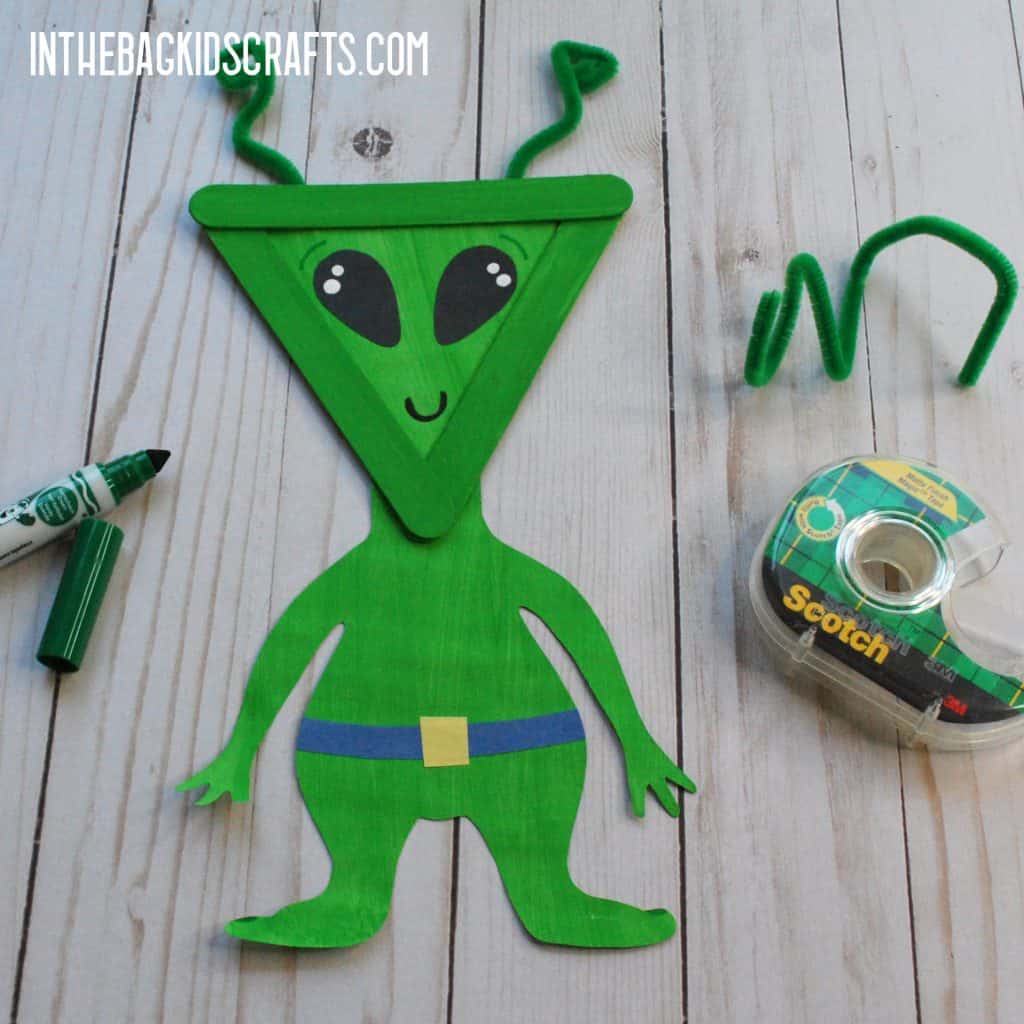
- Draw the body of an alien and cut it out…
- OR print the free DIY space crafts template and trace the pieces onto your green paper (except the eyes which should be traced onto black paper) and cut them out.
- Glue the body onto the triangle, with the point of the triangle facing down.
- Cut the black eyes out and use the glue stick to adhere them to the alien’s face.
- Then snip the pipe cleaner in half and tape the pieces onto the back of the head to form antennae. Twist it into shape.
- The rest of the details are up to you. I cut a utility belt from some scraps of paper and added dots to the eyes using white paint and a q-tip. But you can make the alien look any way that you want! You can even give it extra arms and legs if you want.
*Just like the astronaut, you can change up the color of the alien. Maybe you want to make yours purple…or rainbow? It is yours. So, make it look like you want! I can’t wait to see what you make!
Watch the full video tutorial for this alien craft.
Save this DIY Space Crafts for later! Pin it to your favorite Pinterest board…
Project 3: Space Shuttle
SUPPLIES FROM THE BAG
- 3 Large popsicle sticks
- White paint
- Elmer’s glue
- Newspaper
- Clothespin
- Medium pompom
- Glue stick
- Black Sharpie Marker
- Markers
- White construction paper
- Black construction paper
- Scissors
- Scraps of orange and red construction paper
Step 1: Make the Triangle
- Use the Elmer’s glue to attach 3 large popsicle sticks, forming a triangle frame
- Set the triangle to the side and allow the glue to dry thoroughly
*This is a step that you may want to do the day before and let them sit overnight so that the glue dries completely. While you are at it, make lots of triangle frames so that you are ready to make as many Outer Space crafts as you want! (And, believe me, you are going to want to make them all!)
Step 2: Paint
- Place the triangle frame on the newspaper and squeeze out a little white paint
- Pinch the pompom with the clothespin to form a “paint brush”
- Paint the triangle frame white and set it aside to allow the paint to dry
Step 3: Build the Foundation
- Trace the outside of the triangle onto white paper and then draw a slightly smaller triangle about 1/4″ inside the one you have drawn…
- OR print the DIY space crafts template (below) and trace the triangle from the template onto your white construction paper
- Glue the paper triangle onto the back of the frame
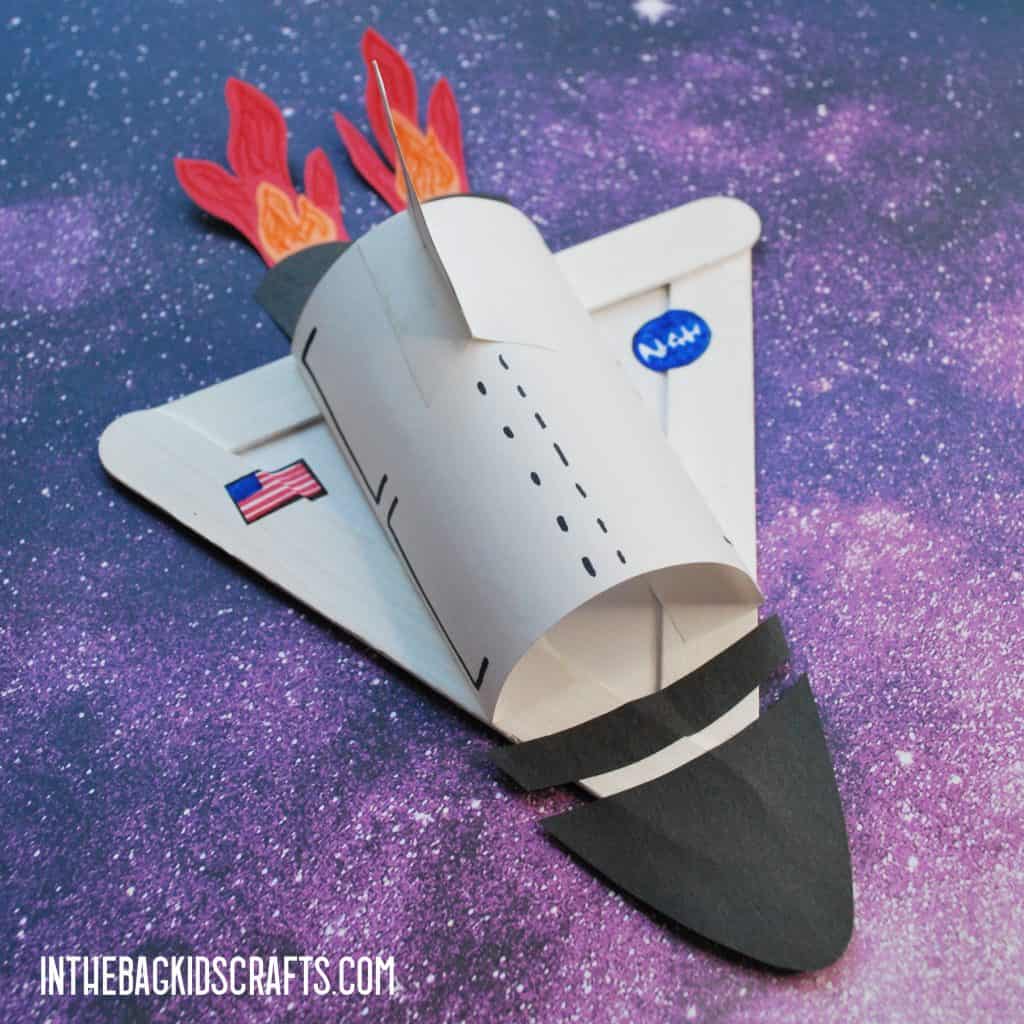
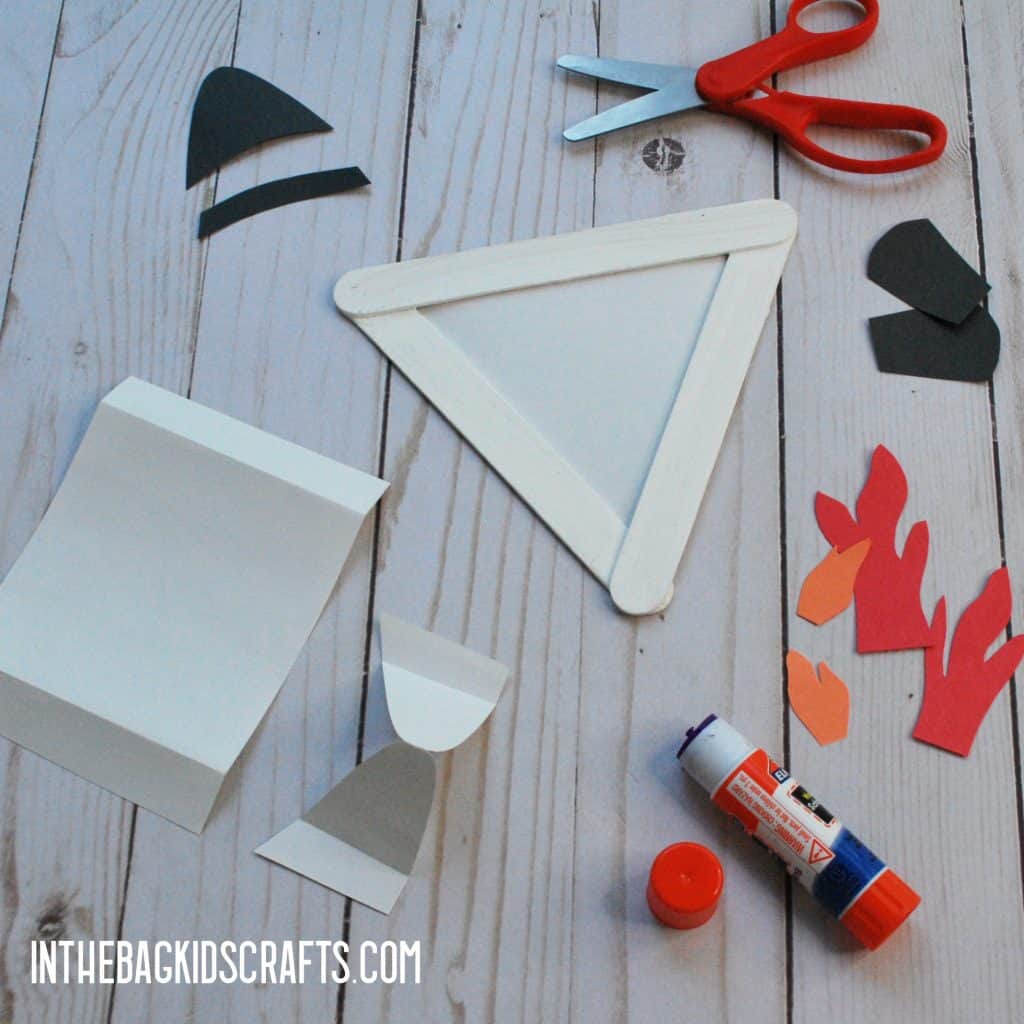
- Cut out the rectangle from the template and fold on the dotted lines.
- Use the glue stick on the folded tabs and glue it down, forming a dome in the center of the triangle. This is the body of the space shuttle.
Step 4: Add the Details
- Use the template to trace and cut out the rest of the details, such as the boosters, fin and tip of the shuttle.
- You can also draw and cut out little details for the wings, like the American flag and NASA symbol. But, remember, this is your shuttle. So, make if your own. If you prefer to draw “Hello Kitty” or a simple star on the wings…go for it!

Project 4: Space Rover
SUPPLIES FROM THE BAG
- 4 Large popsicle sticks
- Elmer’s glue
- White paint
- Newspaper
- Clothespin
- Medium pompom
- White construction paper
- Gray, orange and black construction paper
- Scissors
- Glue stick
- Black Sharpie marker
- Orange pipe cleaner
- Scotch tape
- Paper plate (coated 9″)
- Optional: Silver paint
Step 1: Make the Triangle
- Use the Elmer’s glue to attach 3 large popsicle sticks, forming a triangle frame
- Set the triangle to the side and allow the glue to dry thoroughly
*This is a step that you may want to do the day before and let them sit overnight so that the glue dries completely. While you are at it, make lots of triangle frames so that you are ready to make as many Outer Space crafts as you want! (And, believe me, you are going to want to make them all!)
Step 2: Paint
- Place the triangle frame on the newspaper and squeeze out a little white paint
- Pinch the pompom with the clothespin to form a “paint brush”
- Paint the triangle frame white and set it aside to allow the paint to dry
- Also paint the fourth large popsicle stick white. This will be the pole on the front of the rover for the robot type head.
- Optional: Paint some of the gray paper with silver paint to use on a couple of the details, such as the robot head eyes and the solar panel.
Step 3: Build the Foundation
- Trace the outside of the triangle onto white paper and then draw a slightly smaller triangle about 1/4″ inside the one you have drawn…
- OR print the template (below) and trace the triangle from the template onto your white construction paper
- Glue the paper triangle onto the back of the frame
Step 4: Add the Details
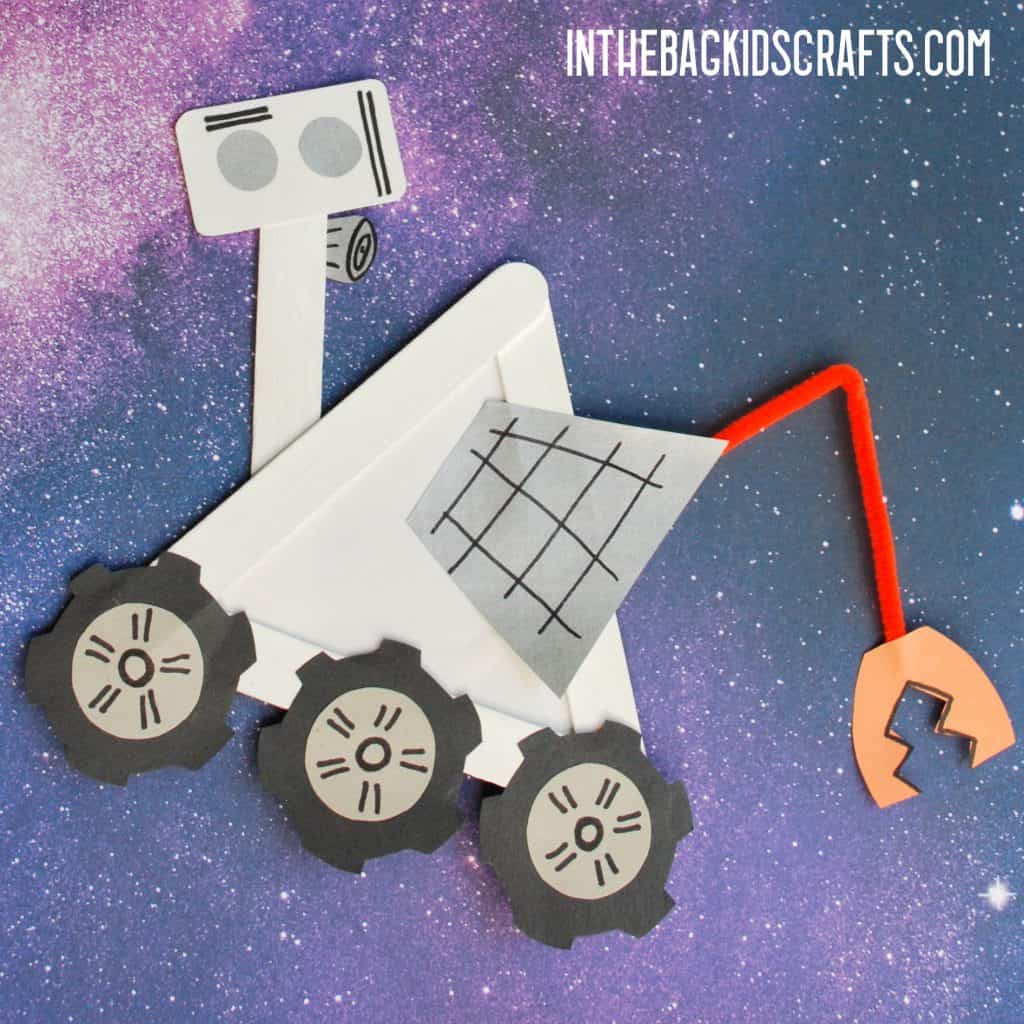
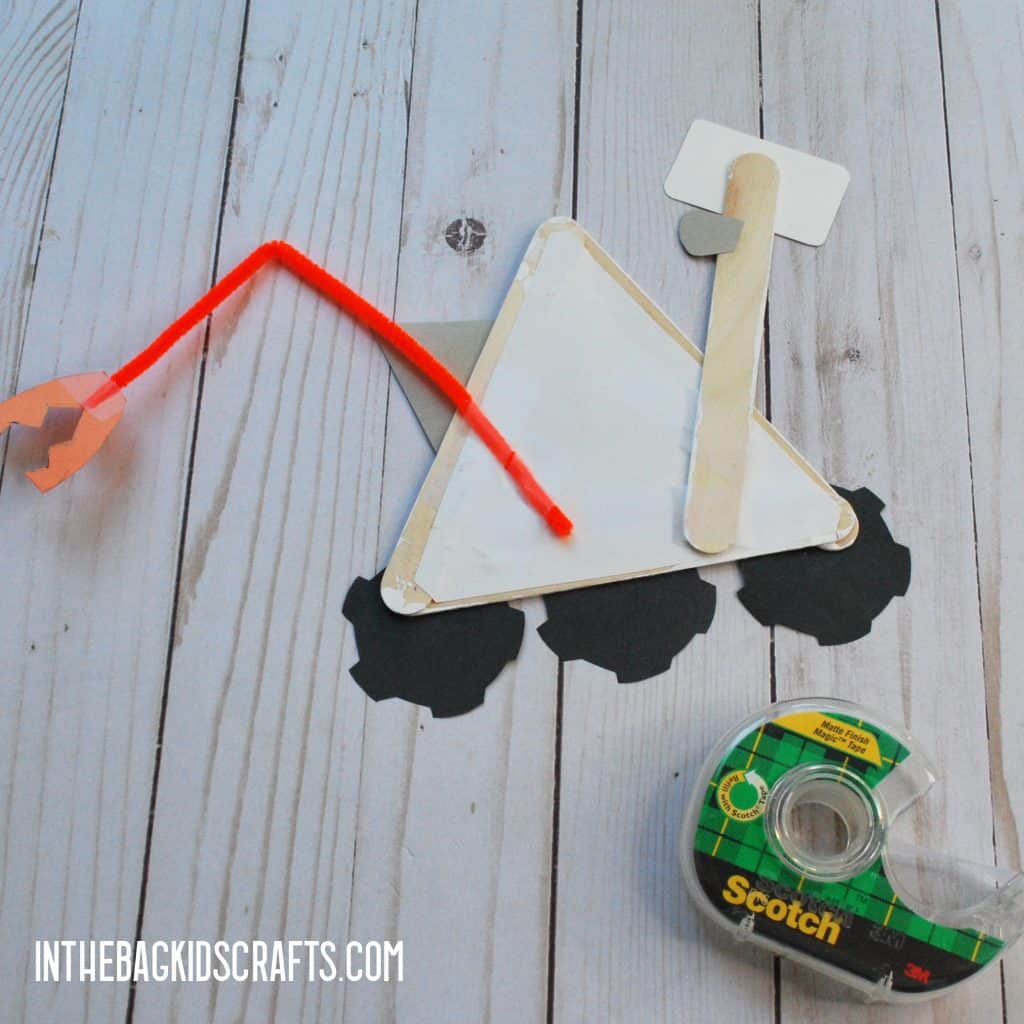
- Draw 3 tires onto the black paper…
- OR print the free template and trace the parts. Then cut them out.
- For the head of the space rover, you can use white paper or the paper plate so that it is more stable. Glue the top of the head to remaining white popsicle stick. Then tape the stick to the front of the rover.
- Use the glue stick to adhere all the remaining pieces in place, except the scoop on the back of the rover.
- Trace onto orange paper and cut out the claw scoop. Tape the scoop onto the orange pipe cleaner. Then tape the pipe cleaner to the back of the rover.
- Use your markers to add details to the space rover as you would like.
Project 5: Planet Crafts (and the Moon)
SUPPLIES FROM THE BAG (for each)
- 3 Large popsicle sticks
- Elmer’s glue
- Scissors
- Glue stick
- Matching paint and construction paper (eg-gray for the moon, blue for the Earth, etc.)
- Newspaper
- Clothespin
- Medium pompoms
- Q-tips
- Paints for adding detail (colors of your choice)
- Optional: Paper plate
- Optional: Scraps of other construction paper for adding details
Step 1: Make the Triangle
- Use the Elmer’s glue to attach 3 large popsicle sticks, forming a triangle frame
- Set the triangle to the side and allow the glue to dry thoroughly
*This is a step that you may want to do the day before and let them sit overnight so that the glue dries completely. While you are at it, make lots of triangle frames so that you are ready to make as many Outer Space crafts as you want! (And, believe me, you are going to want to make them all!)
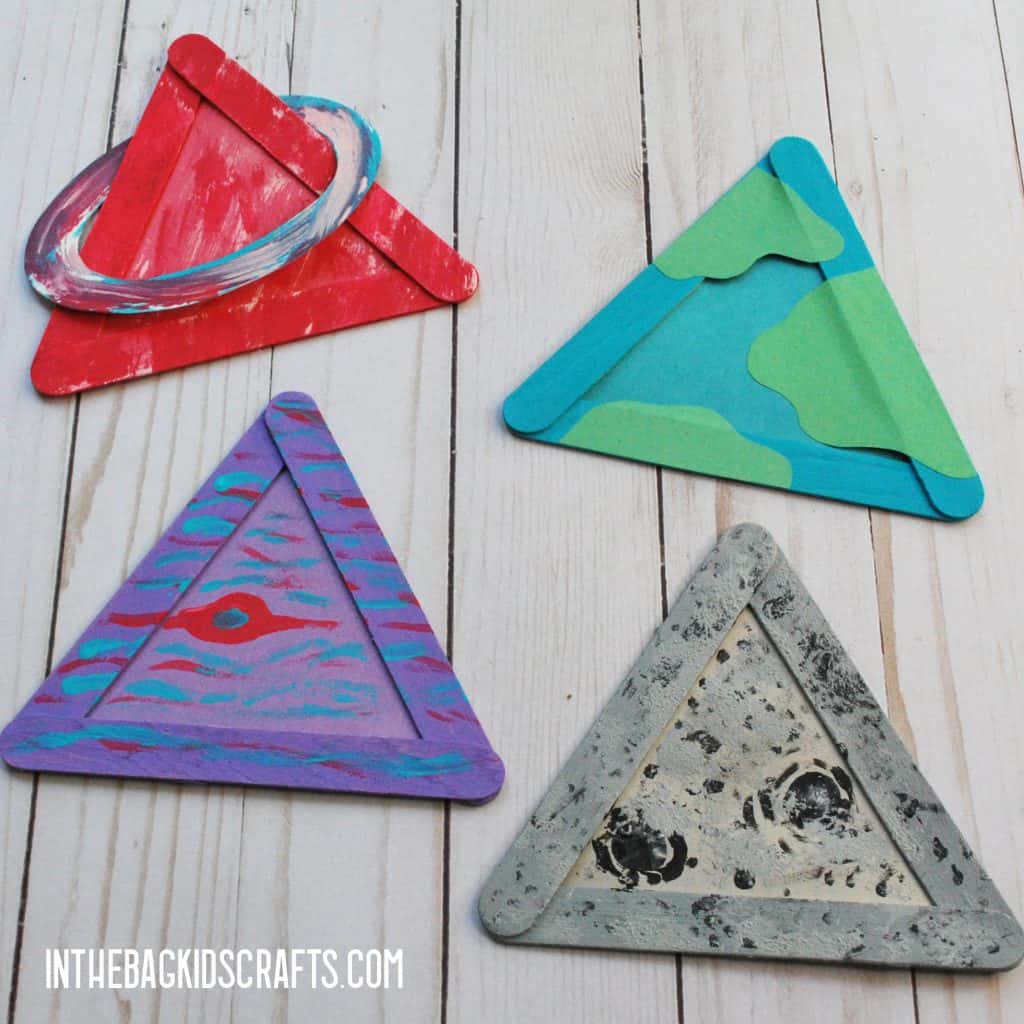
Step 2: Paint
- Place the triangle frame on the newspaper and squeeze out a little paint (color of your choice)
- Pinch the pompom with the clothespin to form a “paint brush”
- Paint the triangle frame and set it aside to allow the paint to dry
Step 3: Build the Foundation
- Trace the outside of the triangle onto black paper and then draw a slightly smaller triangle about 1/4″ inside the one you have drawn…
- OR print the template (below) and trace the triangle from the template onto your black construction paper
- Glue the paper triangle onto the back of the frame

Step 4: Add the Details
- You can use various paint techniques to give your planets life. For example, add stripes of different colors using the q-tips or tap paint on with an extra pompom.
- Feel free to add whatever details you think will help make the planet identifiable. For example, for earth, cut out some land masses from scraps of green construction paper. Or, for Saturn, cut a ring out of a paper plate, paint it and place it over the plant. Jupiter gets a big red spot, and Mars is the red planet. Or you can create your own planet. There are not rules.
As I was creating this collection of space crafts, I was thinking that they would also make a great addition to a space themed party. You could make them as an activity or just use them as decorations. Stretch that imagination by having children use these as props in telling crazy stories as one of the space themed activities. This doesn’t just have to be for a party game, play it any time.
More Space Craft Ideas for Kids
You’re not going to want to stop at just these space crafts. So, here are even more ideas for you to make.
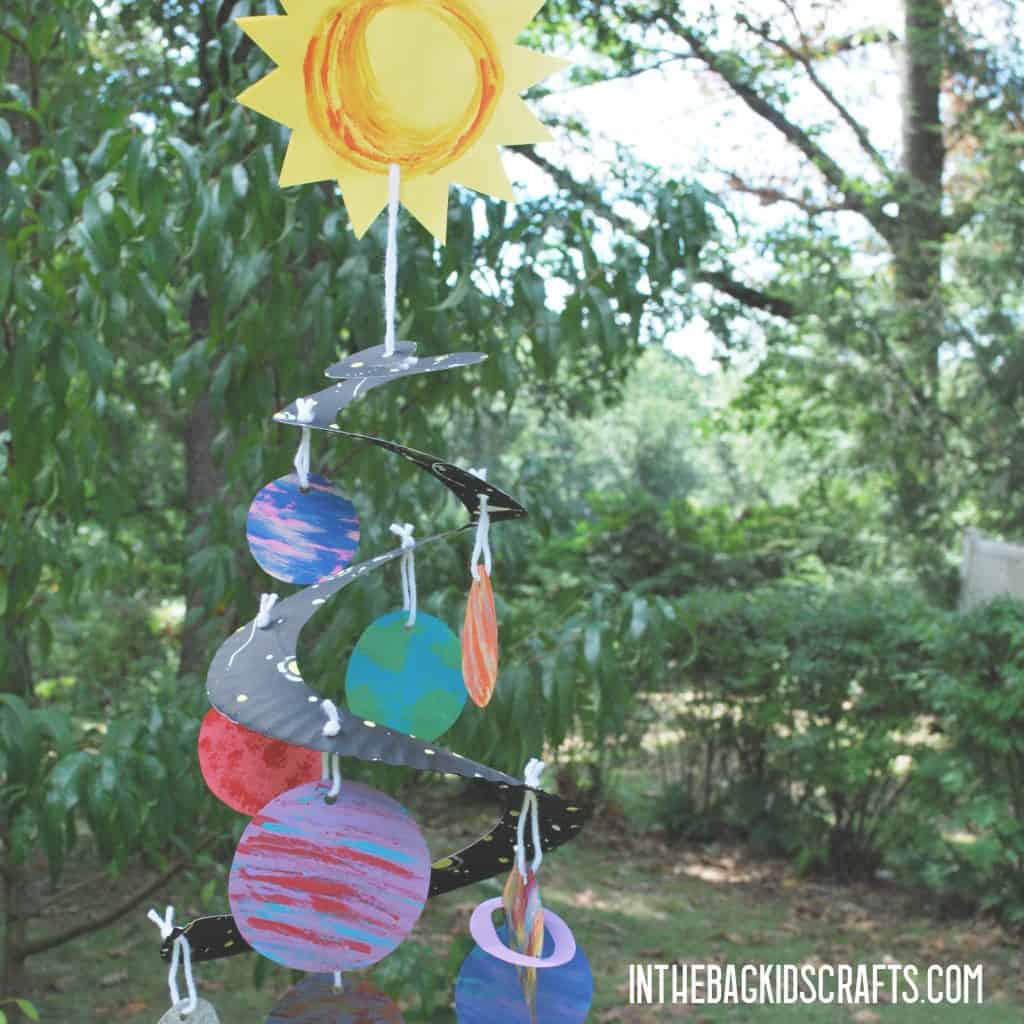
- Solar System Mobile
- Paper Plate Death Star Craft
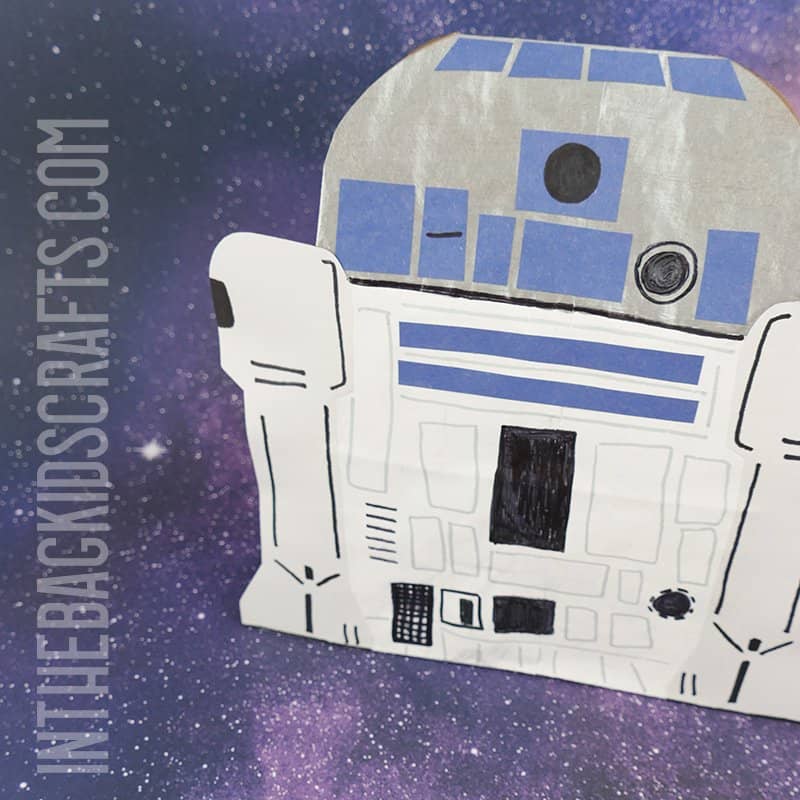
- R2D2 Craft
- Printable Solar System
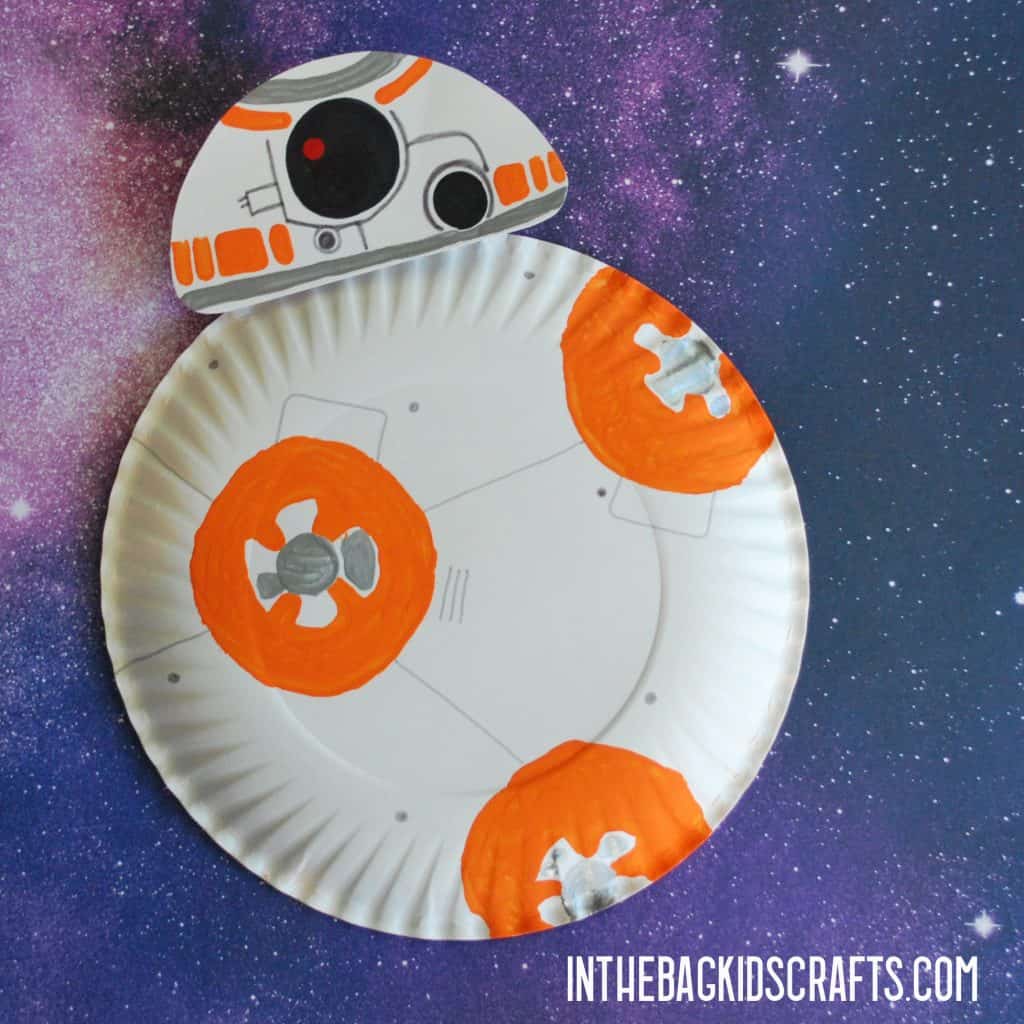
- BB8 Craft
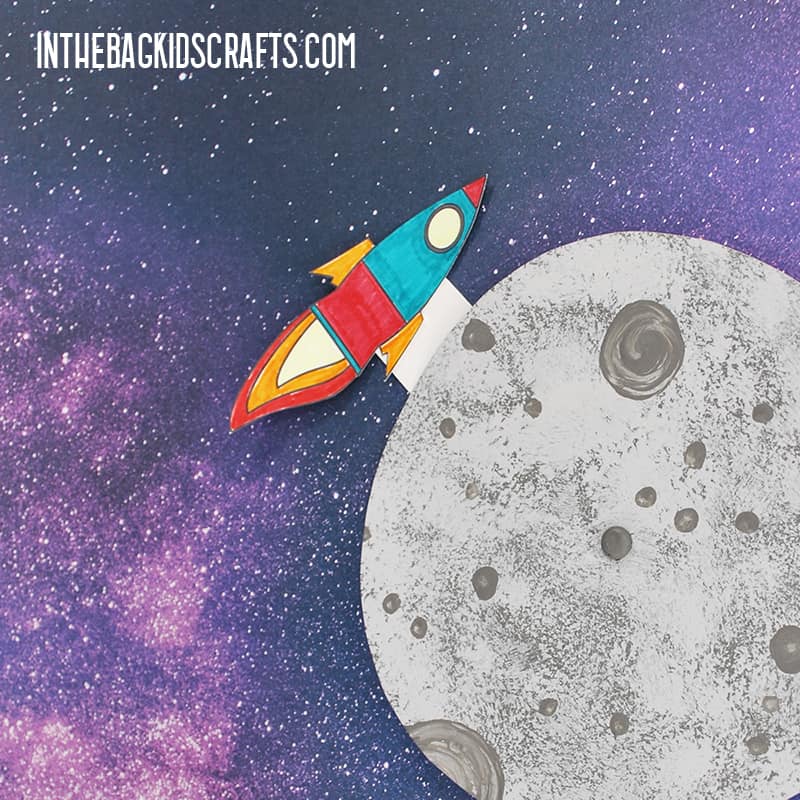
- Rocket Ship around the Moon Craft
- Moon card
- Salt Constellations
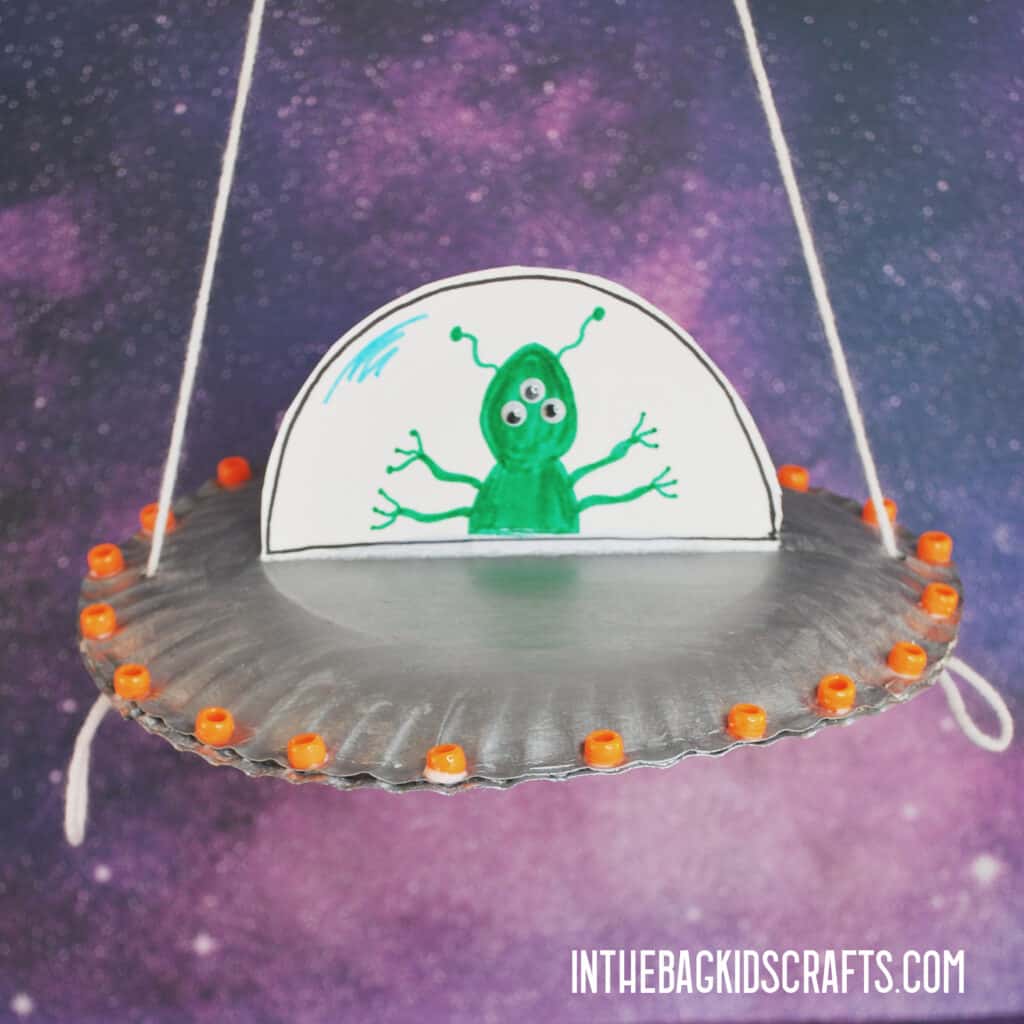
- Flying Spaceship UFO
- Rocket Name Craft
Save this DIY Space Crafts for later! Pin it to your favorite Pinterest board…
FAQ – Space Crafts for Kids ???
These space crafts are designed for a variety of ages, including preschool, kindergarten, and elementary students. Some projects are simple enough for younger children, while others offer opportunities for older kids to add more details and creativity.
Yes! These space crafts are great for classrooms, homeschool settings, libraries, and after-school programs. They work well as part of space-themed lessons, science units, STEM activities, or creative enrichment projects.
Absolutely. Many of these crafts connect naturally to solar system lessons and can help children learn about planets, stars, astronauts, rockets, and space exploration through hands-on activities. They make a fun addition to science and astronomy units.
No special supplies are required for most of these space crafts. Many of the projects use common materials like construction paper, paper plates, markers, glue, scissors, and other basic craft supplies that families and teachers often already have on hand.